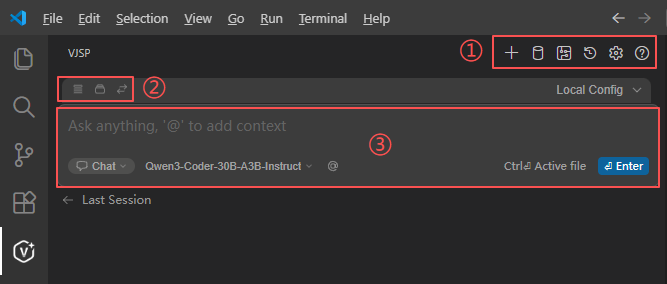
Functional Interface Overview
Interface Area Overview
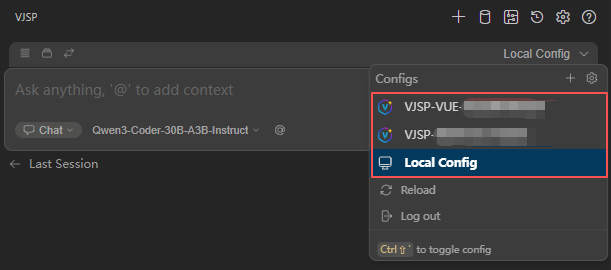
The VJSP interface adopts a simple and intuitive layout design, mainly divided into the top Functional Area, Operation Options Area, Interactive Input Area, and Session History Area. Each area has a clear function, making it easy for users to get started quickly.
Detailed Explanation of Each Area's Function
1. Top Functional Area
Located at the very top of the interface, it contains several core function icons:
"+" Icon (new chat): Click to start a new conversation session.
History Conversation Icon: Click to view past conversation records, facilitating users to review historical interaction content, reuse, or reference previous dialogue information.
Settings Icon: Click to enter the settings interface where users can adjust various parameters.
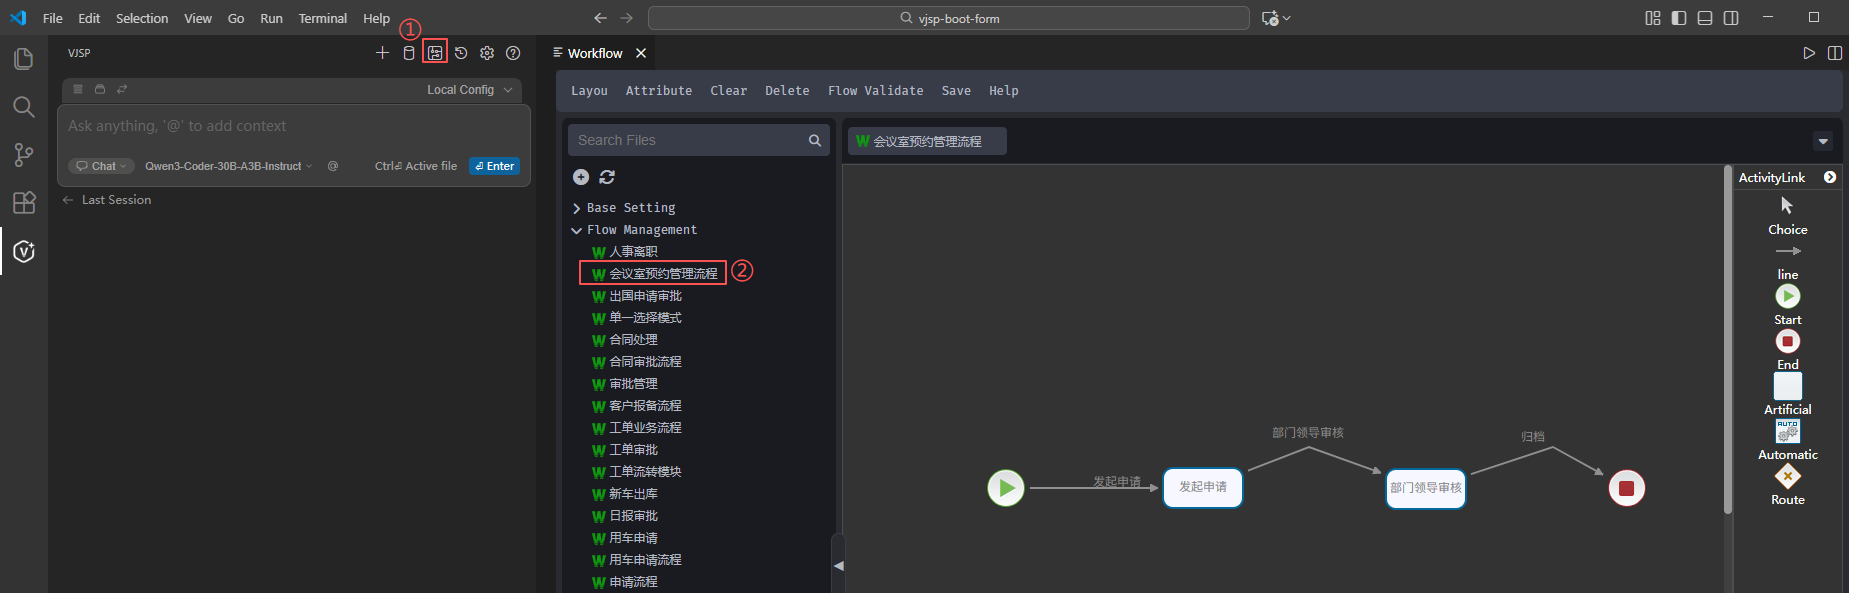
Database Icon: Click to open the database designer, supporting visual database operations.
Workflow Icon: Click to open the workflow designer, where you can create, edit, or view existing project workflows, helping users achieve multi-step, automated task processing.
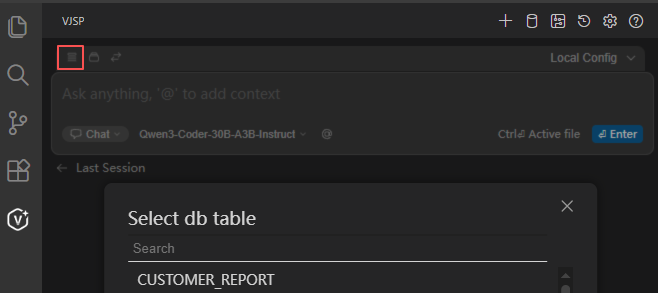
2. Operation Options Area
Operation options include:
Select Database Table Icon: Quickly select database tables, allowing AI to perform Q&A, analysis, or generate code based on the table data.
a. Click the Database icon to pop up the list of connected databases;
b. Click the database table you want to associate, and the plugin will synchronize the table structure information to the AI context;
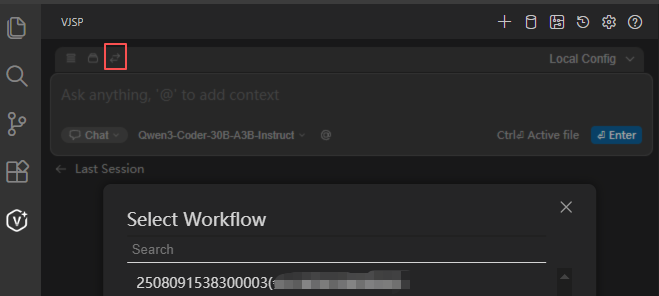
Select Workflow Icon: Used to select workflows already created in this project for use in module development.
3. Interactive Input Area
This is the core area for user interaction with VJSP:
Input Box: Users can input questions, instructions, or requirements here; entering "@" can add context (such as associating files, databases, workflows, etc.) to enhance the precision of interaction. Click the "@" button on the left side of the input box to quickly select content for the AI conversation.
Files: Provides context information related to project files, helping AI understand the file system to optimize code assistance.
Code: Obtains context from the code itself, enabling AI to generate auxiliary content that fits the code logic.
Git Diff: Provides context for Git version differences, allowing AI to provide precise assistance for changed code parts.
Folder: Provides context on a folder-by-folder basis, helping AI grasp the code scenario under the project directory structure.
Current File: Focuses on the currently opened file, providing the complete context of this file to AI for targeted assistance.
Terminal: Incorporates context information related to the terminal, enabling AI to provide coding assistance combined with terminal operation scenarios.
Problems: Provides context based on problems in the code (such as errors, warnings), helping AI generate problem-fixing solutions.
Rules: Provides context related to custom rules, allowing AI to perform coding assistance according to preset rules.
Mode Selection (Agent Dropdown): Allows switching interaction modes. AI's behavioral logic and functional focus differ under different modes, adapting to diverse scenarios.
Click the Mode dropdown button to choose from three interaction modes:
Chat Mode: Pure conversational interaction, supporting free questioning and multi-round communication, suitable for flexible code requirement scenarios;
Plan Mode: Read-only analysis mode, where AI only provides code analysis reports and optimization suggestions without generating executable code, suitable for requirement梳理 and solution evaluation;
Agent Mode: Executable modification mode, where AI supports directly applying generated code in the project (such as inserting files, replacing code blocks) after generation, suitable for efficient development scenarios.
Model Selection
Click the Model dropdown button to switch between different AI models (models configured in the agent). Developers can choose the most suitable model to balance efficiency and effect.
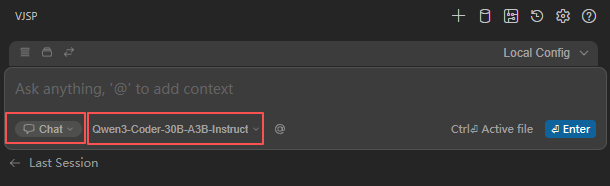
Model Selection: Click the dropdown box to select different models. Different models have varying capabilities in code generation, natural language understanding, etc.
"file" identifier: Prompts users that they can quickly associate the currently active file using the shortcut "Ctrl+J", using the file content as interaction context.
"Enter" button: Click or press the Enter key to submit the input content and trigger an AI response.
Agent Selection:
4. Visualization Tools
4.4 Command Center
Click the Command Center button to pop up a list of preset common command templates. Click the corresponding template to quickly trigger AI operations without manually entering the complete command, simplifying complex operation processes.
5. Agent Collaboration Mechanism
System Built-in Agents, Click for Details
VJSP has built-in various specialized agents, each with predefined clear role positioning and capability boundaries (such as Front-end Engineer, Back-end Architect, Database Expert, Test Engineer, etc.). During the code generation process, the system automatically schedules multiple agents to collaborate based on the task context:
Clear Role Division: Front-end agents focus on UI and interaction logic, back-end agents are responsible for interfaces and business rules, database agents ensure Schema and query optimization.
Context Sharing: Each agent reasons based on unified project structure, form definitions, workflow configurations and other metadata, avoiding information fragmentation.
Result Cross-Verification: Critical logic is generated in parallel by multiple agents and compared, improving the reliability and consistency of the output.
Through this "multi-expert collaboration" model, VJSP can generate high-quality code that is structurally complete, clearly responsible, and directly runnable, significantly approaching real development scenario requirements.
Custom Agent Support, Click for Details
When the system's preset agents cannot fully meet your specific scenario needs, VJSP supports creating custom agents locally.
You can define based on existing templates or from scratch:
Exclusive Role (e.g., "Financial Compliance Reviewer", "IoT Device Controller")
Domain Knowledge Base (Inject business terminology, internal API specifications, coding standards, etc.)
Behavior Rules (Specify output format, call toolchain, restrict permission scope, etc.)
Custom agents will be seamlessly integrated into VJSP's collaborative generation process, participating in code reasoning and verification together with other system agents, ensuring that the output results not only comply with general engineering standards but also fit your personalized business logic.
💡 Tip: Custom agent configuration files are by default saved in the
.vjsp/agents/directory in the project root, supporting version management.
Result Processing and Interaction
After AI generates content, you can efficiently use or manage the results through the following operations:
1. Quick Reuse
- Quote: Automatically fills the reply content into the input box, convenient for continuing questions.
- Insert Code: One-click to insert the code at the current cursor position in the file.
- Copy: Copy the current reply (code or text) to the clipboard.
2. Safe Application
- After clicking the Apply button, the system will pop up a confirmation window:
- ✅ Confirm: Write the content to the project
- ❌ Cancel: Abandon the modification, ensuring safety
3. Conversation Optimization
- Concise Conversation: Automatically collapses redundant content, retaining key information.
- Generate Rules: Save this interaction as a reusable rule for subsequent similar needs.
4. Management and Feedback
Delete: Remove individual unwanted replies.
Like / Dislike: Feedback on content quality, helping AI continuously optimize.
All operations are equipped with intuitive buttons, eliminating the need for manual copy-paste, improving development efficiency and experience.