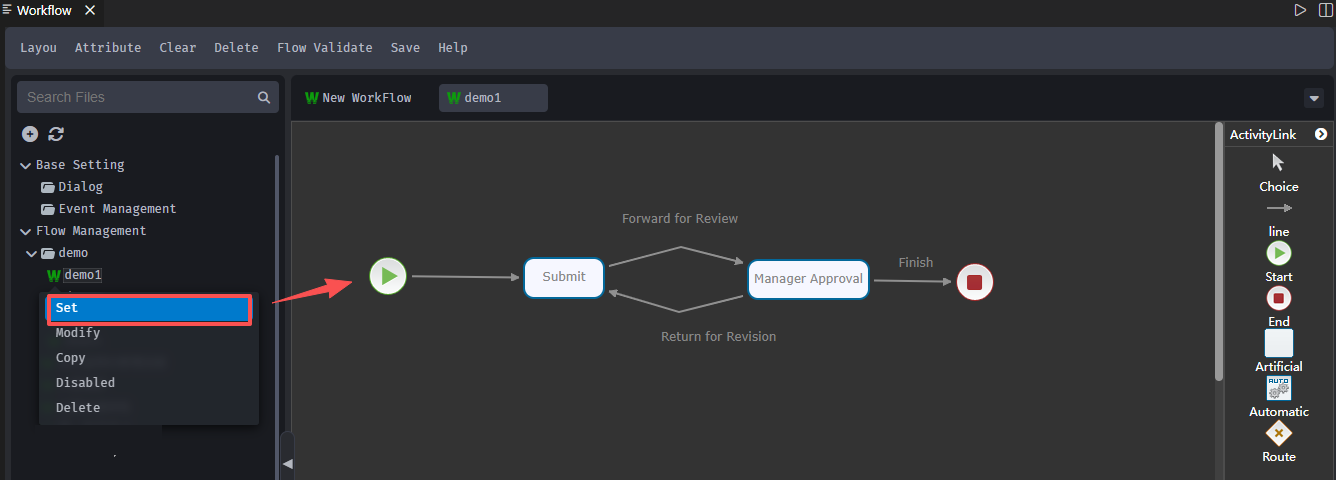
Process Settings
To access the process settings page, follow these steps: Select a process, right-click to choose 【Settings】, then enter the process settings page as shown in the figure below:
Navigation Bar Function Guide
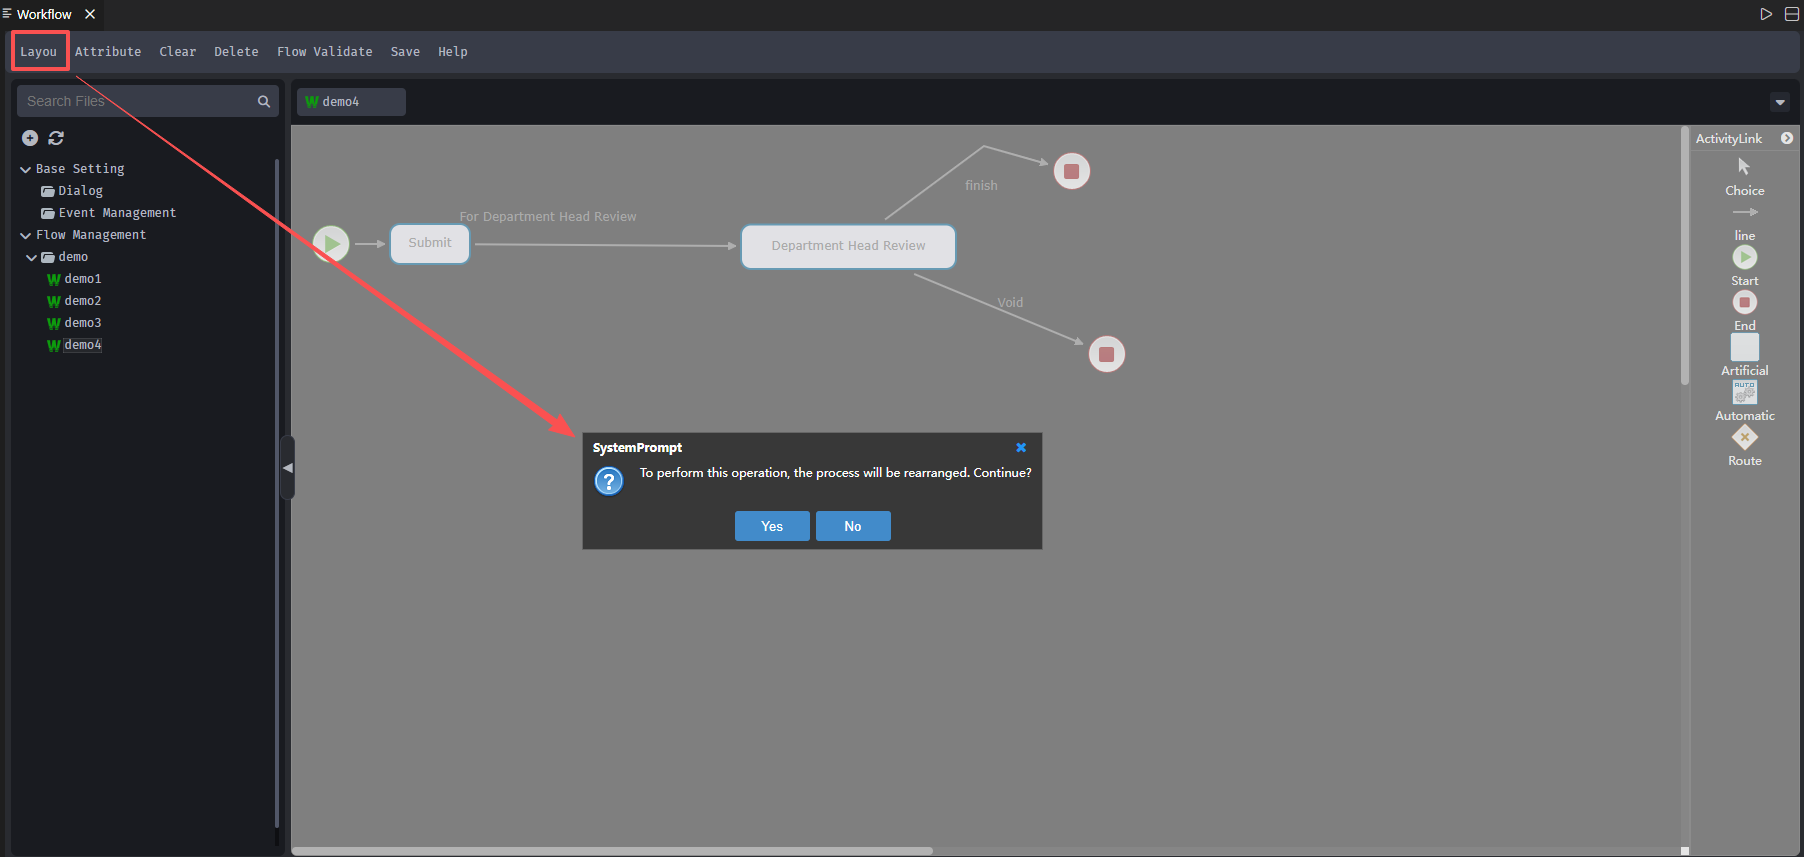
Layout: Reorganize the workflow layout
Steps: Click 【Layout】to open a dialog box, click 【YES】, and the workflow will be reorganized, as shown in the figure below:
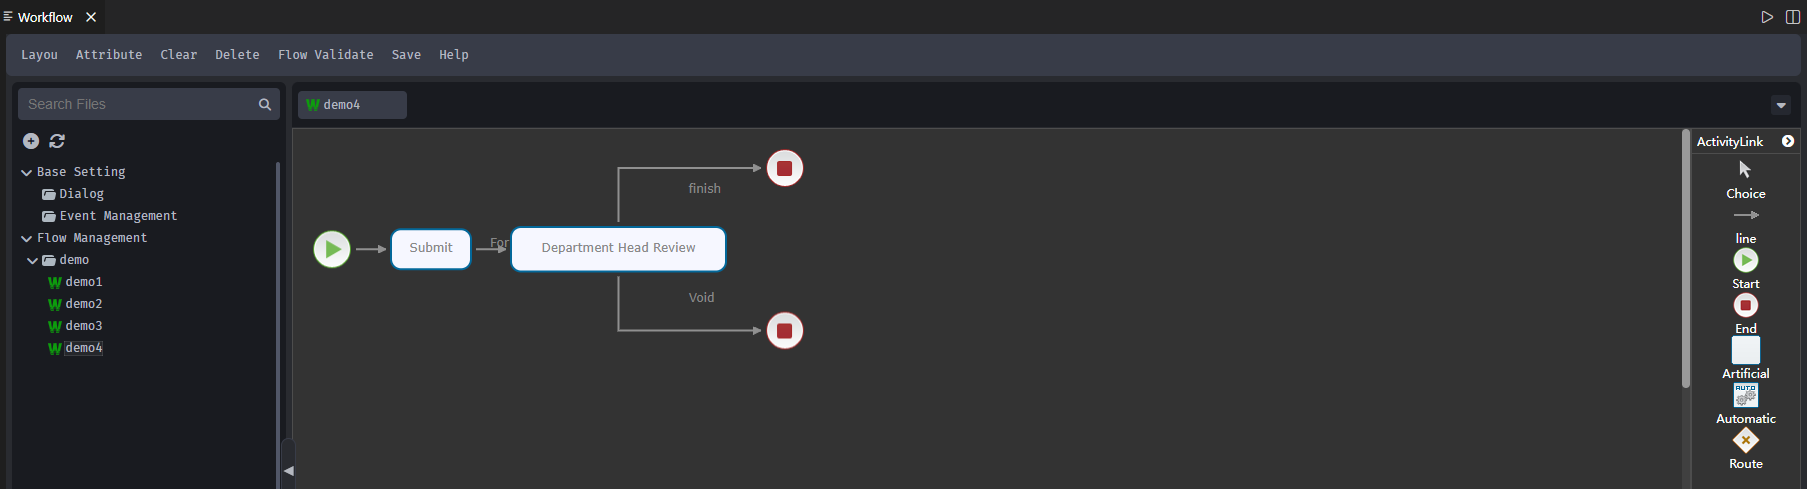
The layout result is shown in the figure below:
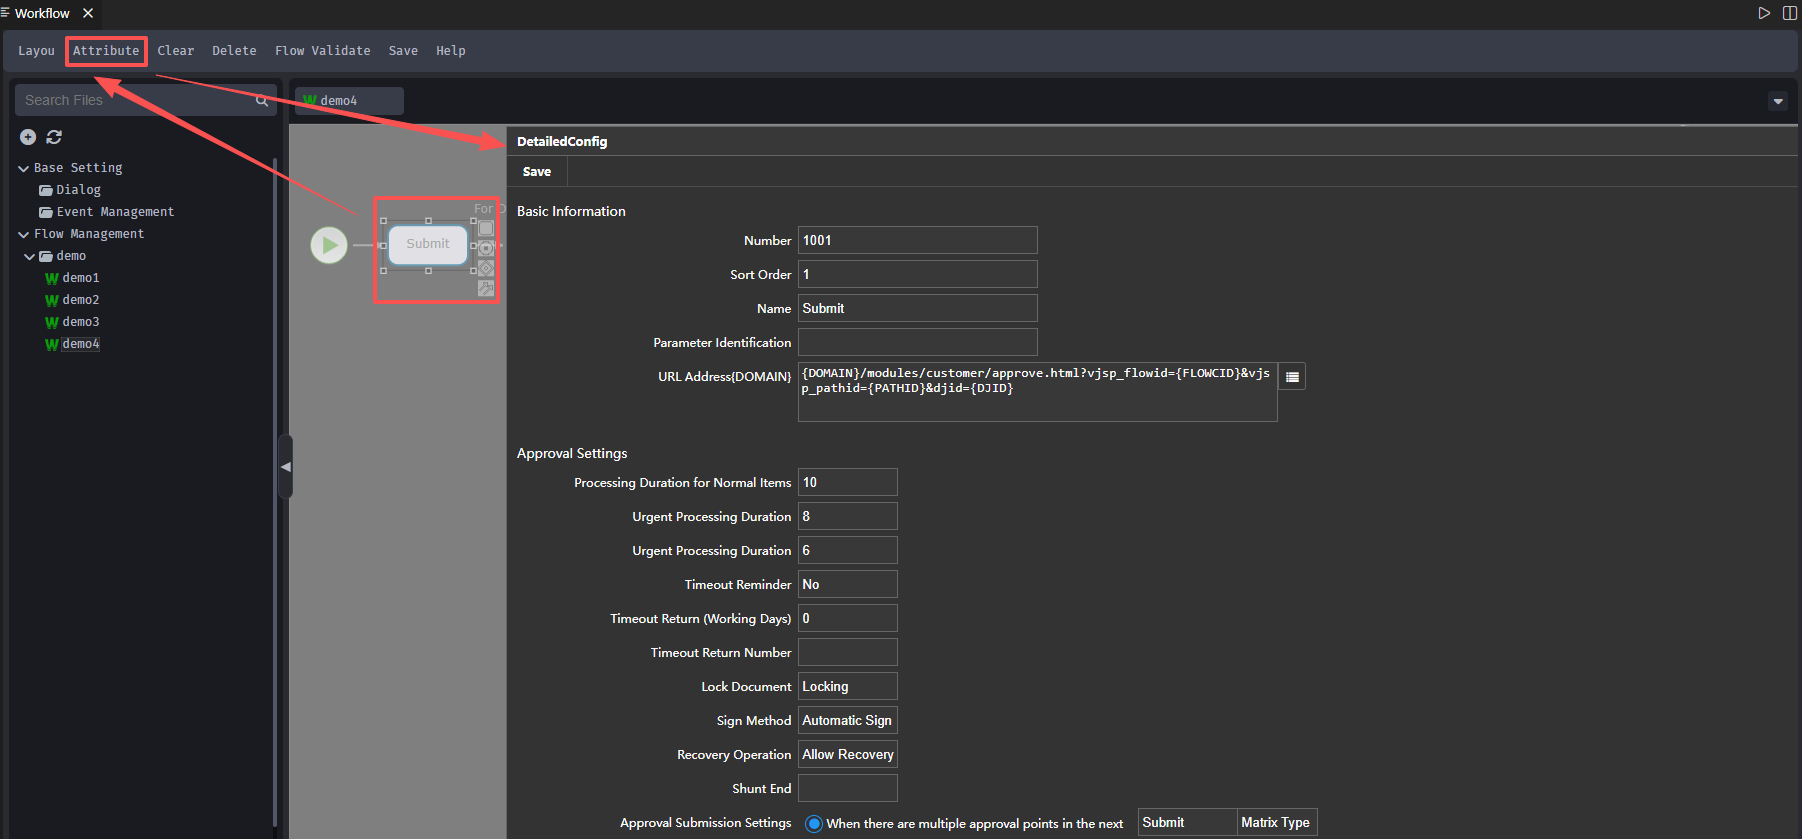
Properties: After selecting a process control, click 【Properties】 to view the detailed control configuration page, as shown in the figure below:
Clear: Cleared all nodes and process controls from the page
Delete: Select a process control then click 【Delete】 to delete this control
Process Validation :Validate whether the current set process can be executed, as shown in the figure below:

Flow Control Terminology Explanation
Terminology Explanation:
| Icon | Name | Explanation |
|---|---|---|
 | Start Element | The first activity of the approval process, representing the start of the process. A process can only have one start activity. It can set the name, parameter indicator, and other information |
 | End Element | The final activity of the process, indicating the end of the process. A process can have n end activities. End activities can set document approval or document cancellation |
 | Manual Element | An approval node in the process. You can set the approver for this node or set the logic to enter or leave this node in process function |
 | Connection Line Element | The element that connects various approval nodes, with the direction of the arrow on the line representing the direction of the workflow. Logic judgments can be set in connection lines for data flow |
 | Automatic Element | An element that invokes other functionality, enabling features like CC/XOR, reassignment, logical delete, physical delete, returning to the previous step, or returning to a previous level. It can also have custom events executed during system invocation for logical processing |
 | Route Element | A route without business rules. It is used to indicate that the workflow engine needs specific processing or logical judgment when business reaches here, then proceed to the subsequent node based on the judgment or processing outcome |
Start Control
Represents the beginning of a process, and there can only be one start activity per process. Clicking the control →【Properties】or right-clicking the control →【Detailed Configuration】allows you to set its functionality, as shown in the image below: 
- Numbering: Automatically generated by the system based on the order of component appearance
- Ordering: Controls the sequence of generated functional buttons
Use Case: Controlling the arrangement order of the "Return" and "End" function buttons at the leader's approval node, and the flow is illustrated in the figure below:

Steps are as follows:
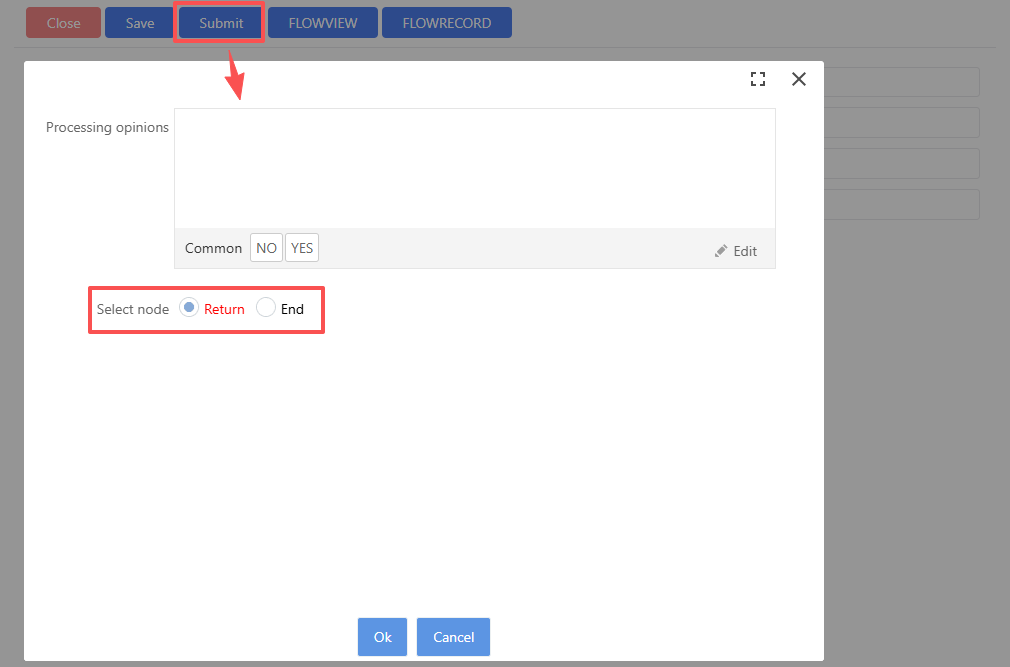
Set the sort order of the "Return" line to 0, as shown in the figure below:
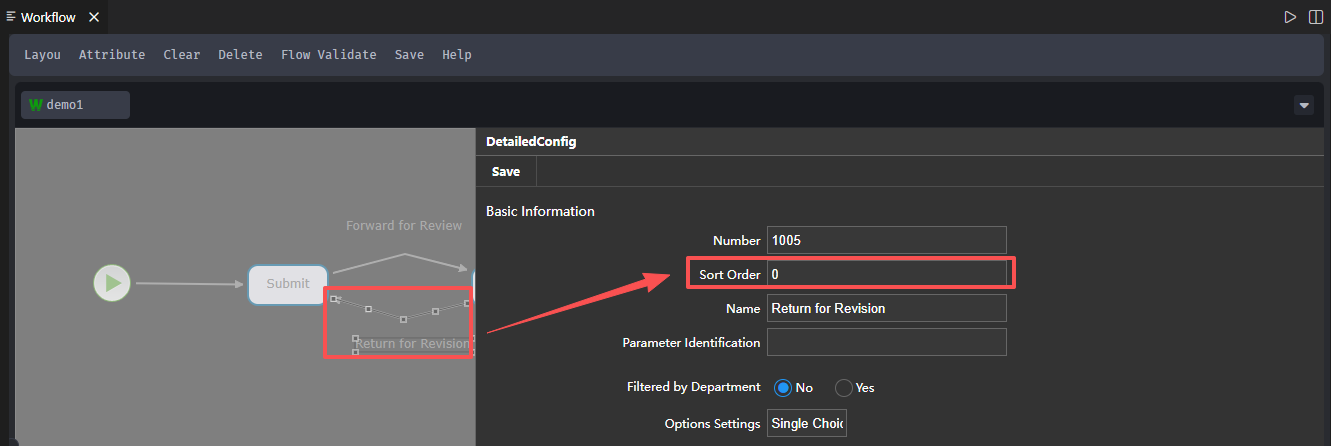
Set the "End" connection line's sorting order to 1.
The result appears as shown below (The “Return” option is positioned before the “End” button):
Name: Describes the name of the current approval node
Parameter Identifier :Assign a special identifier to the current node, which helps in querying this specific node via the parameter identifier within the database
Line Control
Connect the various approval nodes together, with the direction of the arrow on the line indicating the direction of workflow flow.
Operation as follows: Click the line control →【Properties】or right-click the control to click 【Detailed Configuration】, which will pop up the detailed configuration interface to set its function, as shown in the figure below:

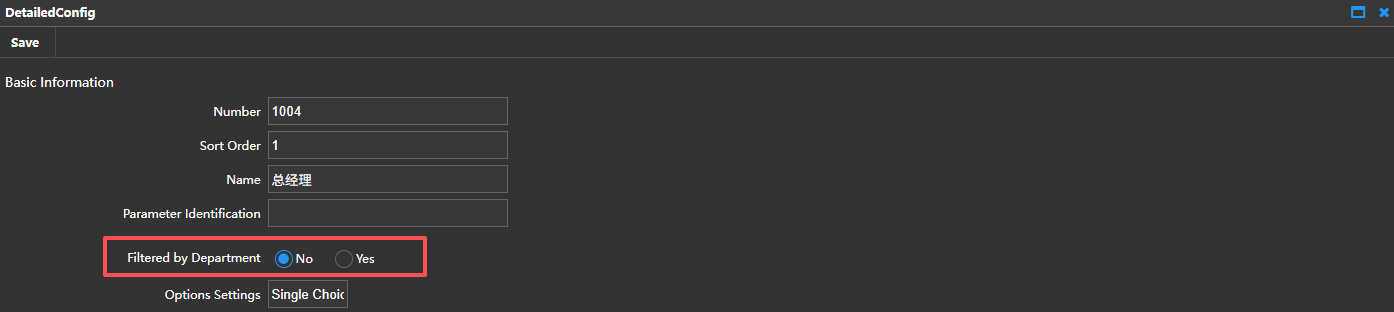
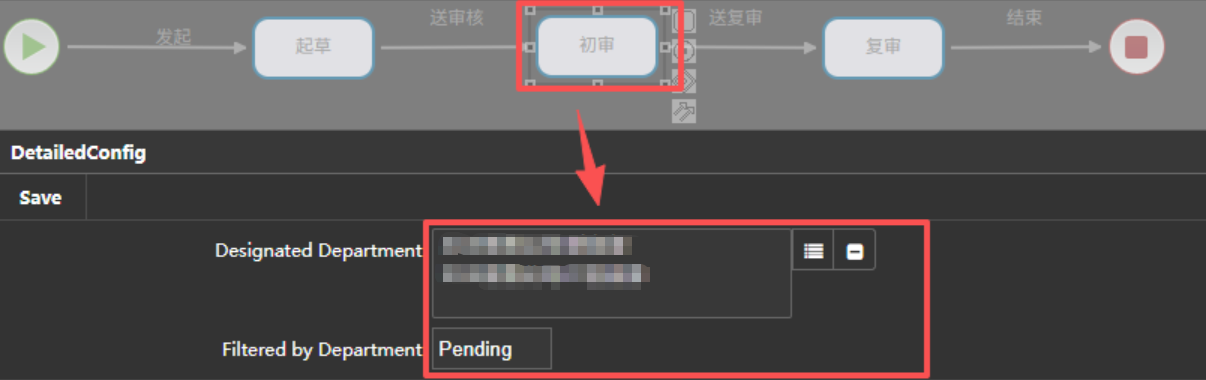
Filter by Department
Application Example : At the "Initial Review" node, specify that the review should be conducted by either the Finance Department or the IT Information Department, and designate the department's review personnel. The system needs to list the approvers for the "Initial Review" node in the order of Department → Personnel as optional choices when submitting for initial review. The system workflow is as shown in the figure below:

The procedure is as follows:
Click 【Workflow Designer】→【Basic Setup】→【Dialog Box】→【New】; the dialog box type is “process personnel filter” as shown in the figure below:

On the connection line control “Send to Initial Review,” set up department-based filtering and decide on execution personnel by choosing the dialog box, as demonstrated in the figure below:
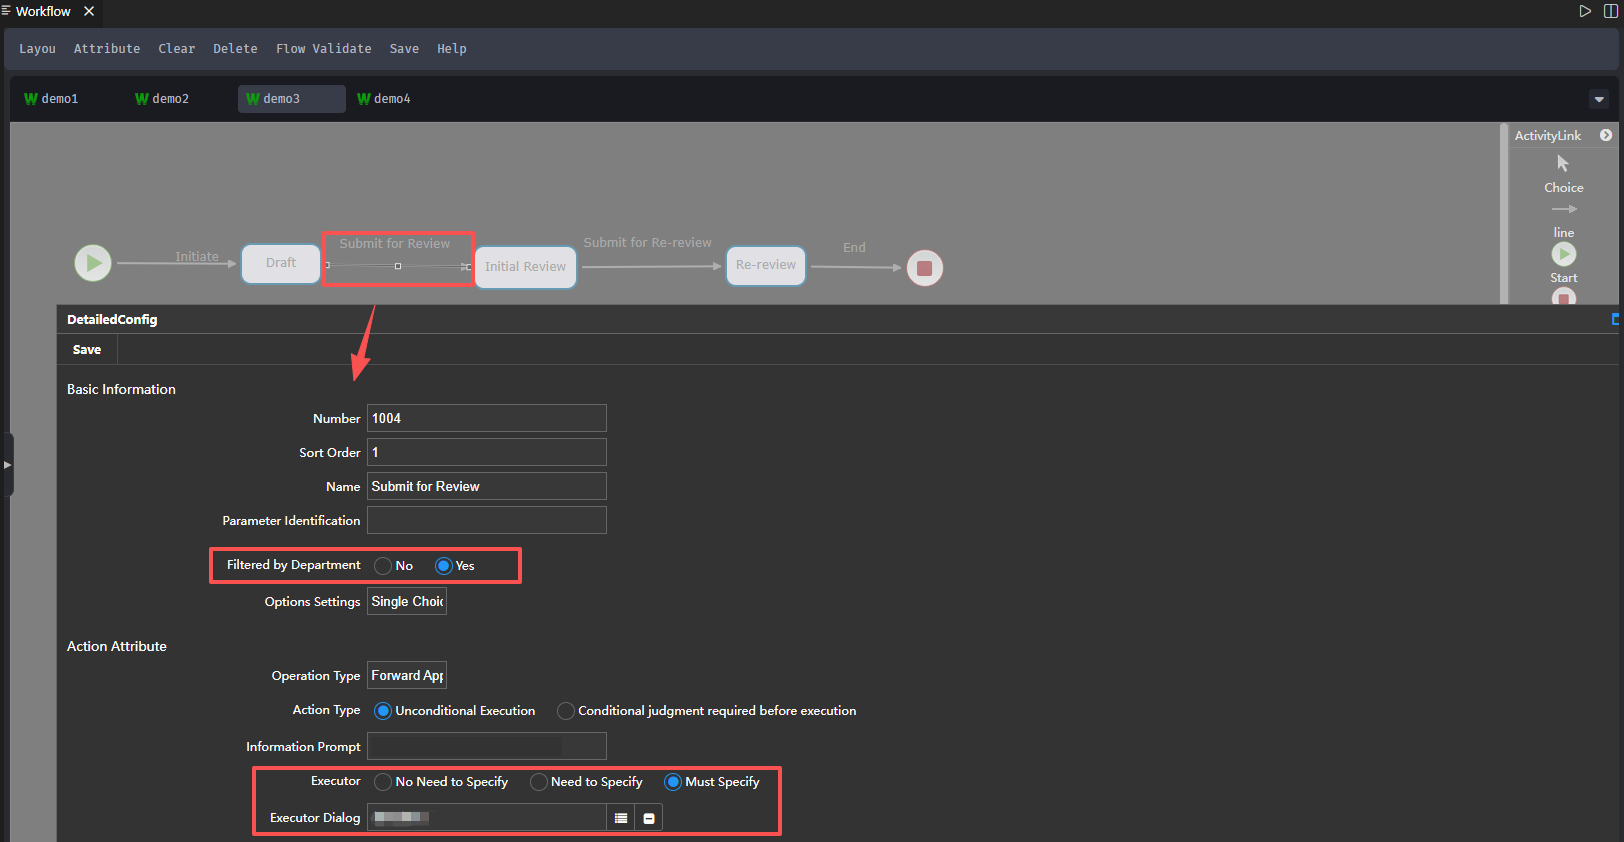
The Initial Review node's “Assign Department” should be set to Finance or IT Information Department, with option for department filtering selected as “Optional”, shown in the figure below:
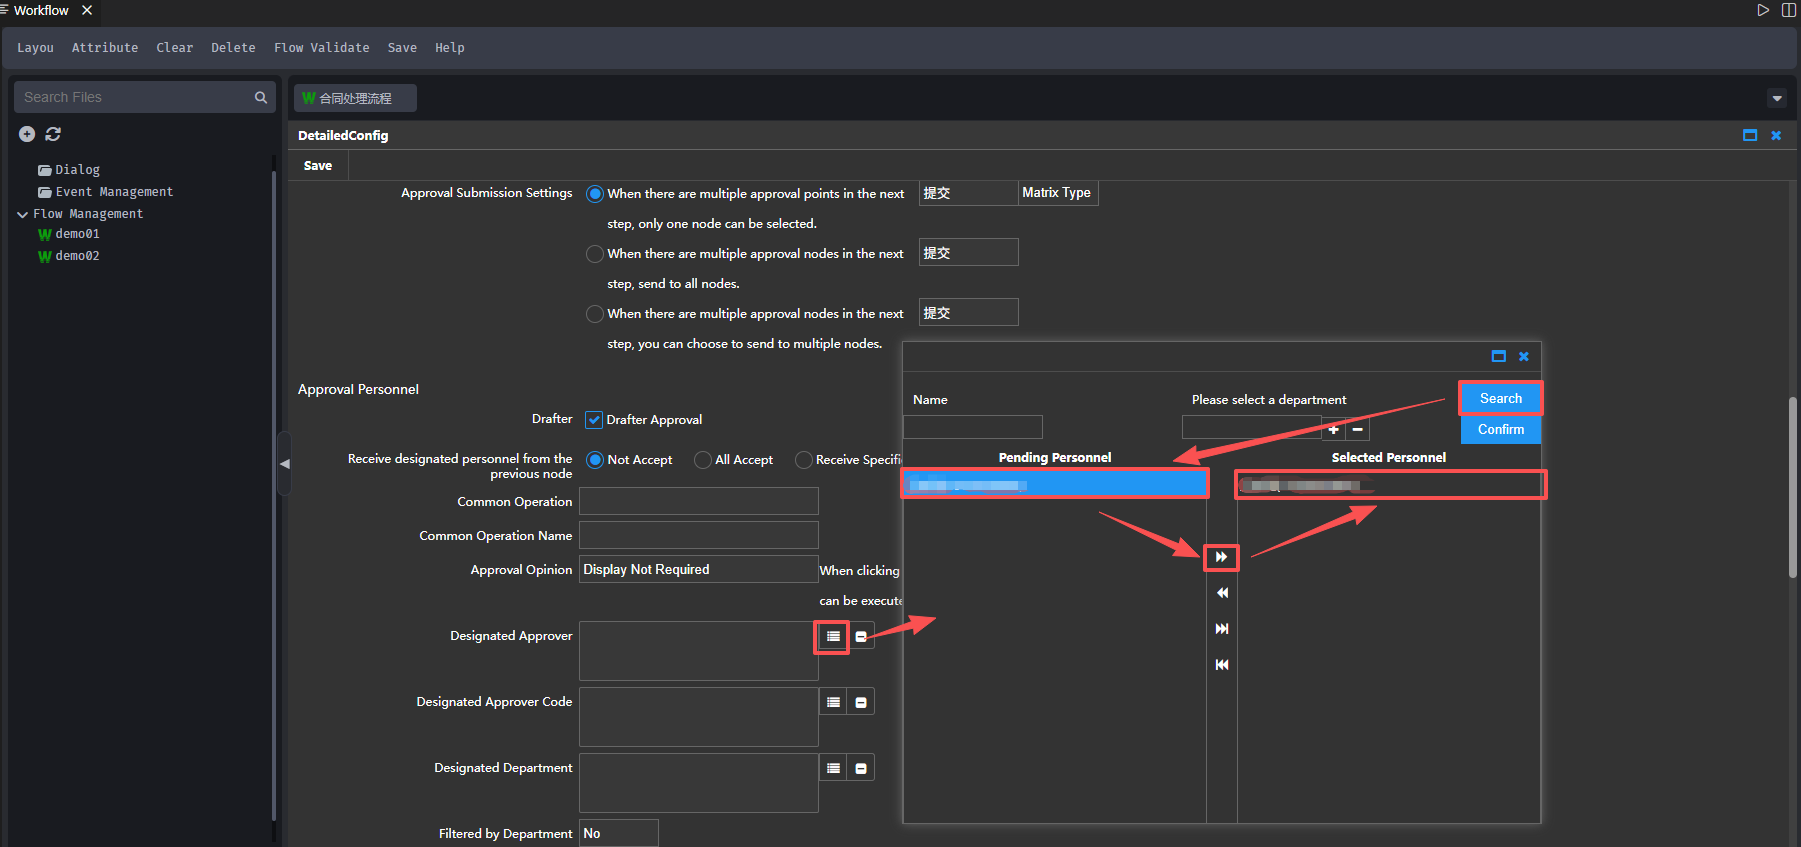
For choosing approvers, click the [Add] button and select approvers in the pop-up window, as seen below:
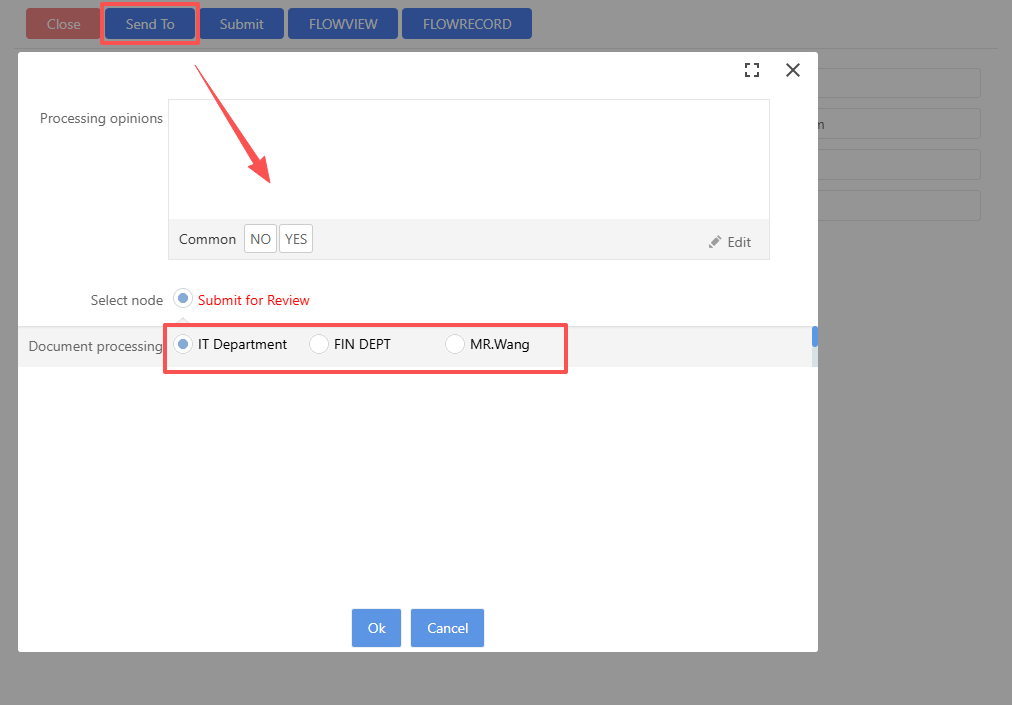
The result looks like this: once logged into the application platform, creating a draft document, and clicking [Send], the following dialog box appears on the screen:
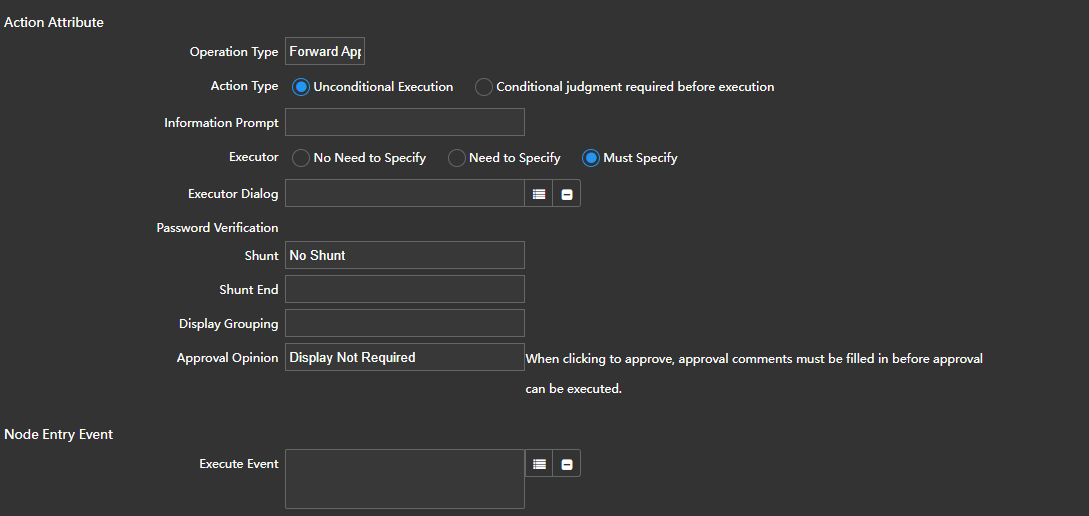
Action Properties
The capabilities included in Action Properties as shown in the figure below:
Operation Type
Forward Approval: The arrow direction on the line control points forward, indicating approval is passed from the current node to the next node in the workflow sequence
Application Case: A document created by the author goes through department head approval and then general manager approval, like shown in the diagram below:

Backward Approval: This refers to current node approval that detects issues or for other reasons deems the document ineligible to pass through to the next node, thus returning the document to a prior node or different node for further handling
Case Example 1 (Return to the Previous Node): When the document reaches “Department Head Approval,” if issues are found or if the input information is incorrect, document can be returned to prior node to be re-edited, as shown in the diagram below :

Operations as follows:
- Set a link between “Department Head Approval” and “Submit” nodes, directing arrows from “Department Head Approval” to “Submit”()
- Set this link's operation type to backward approval, generating a “Return” option on the “Department Head Approval” node shown below:
Case Example 2 (Return to Different Node): Suppose when the document reaches General Manager Approval, the document is questioned for serious flaws that necessitate the creator to remake it. In such a situation, the document can be sent back through multiple stages to the creator as shown in the figure below:

On the “General Management Approval” node, generate a “Return to Creator” option as follows:

Normal Action: This action does not affect or control the direction of data flow in the approval process like forward or backward actions. Instead, it works in conjunction with external action functions to generate new buttons, such as function buttons designed for functions like reassignment, inclusion, physical deletion, logical deletion, return to a previous step, or to go back several steps up the hierarchy. Following are examples of additional functionalities enabled by these action types: Reassign, CC, Physical Delete, Logical Delete, Return to Last Step, Return to Previous Level, etc.
Application Example : Execute a dedicated function on the "Department Management Head Approval" node to generate its own button which can reassign the task directly to someone else for processing as shown below:
Operation Steps :
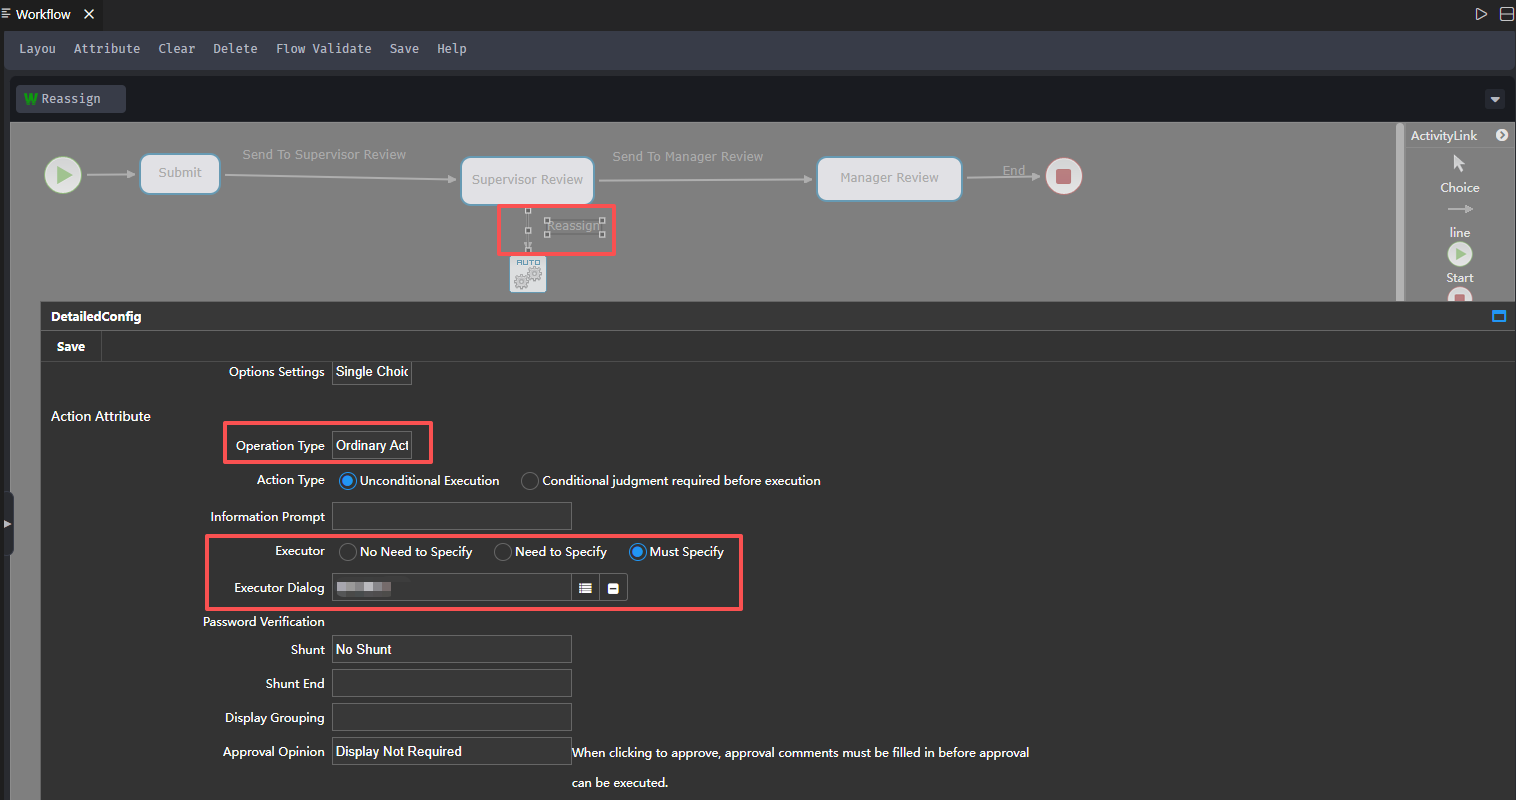
Add a functional control, and then a link control with name “Reassign”, set the operation type between the link and the automatic control as “normal action,” and specifically assign executors to this reassign node. Additionally, set the executives to be selected as "Required to be specified" or "Must be specified", exactly as shown below:
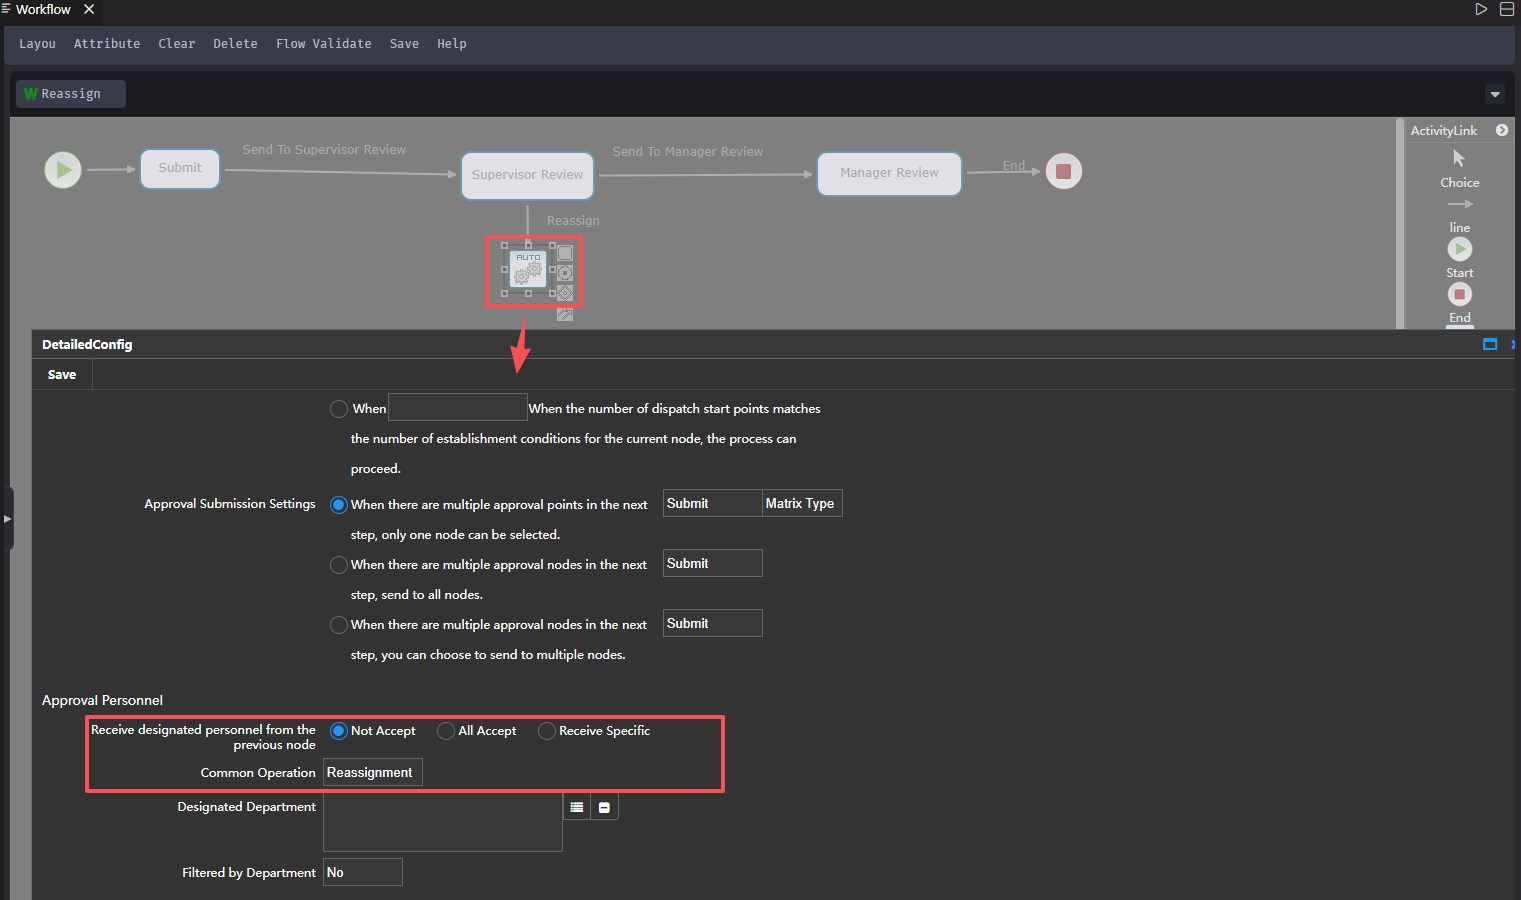
Configure the functional control under the common actions label to reassign it, allowing the type to shift by accepting the processor set by the link control, exactly as shown below:
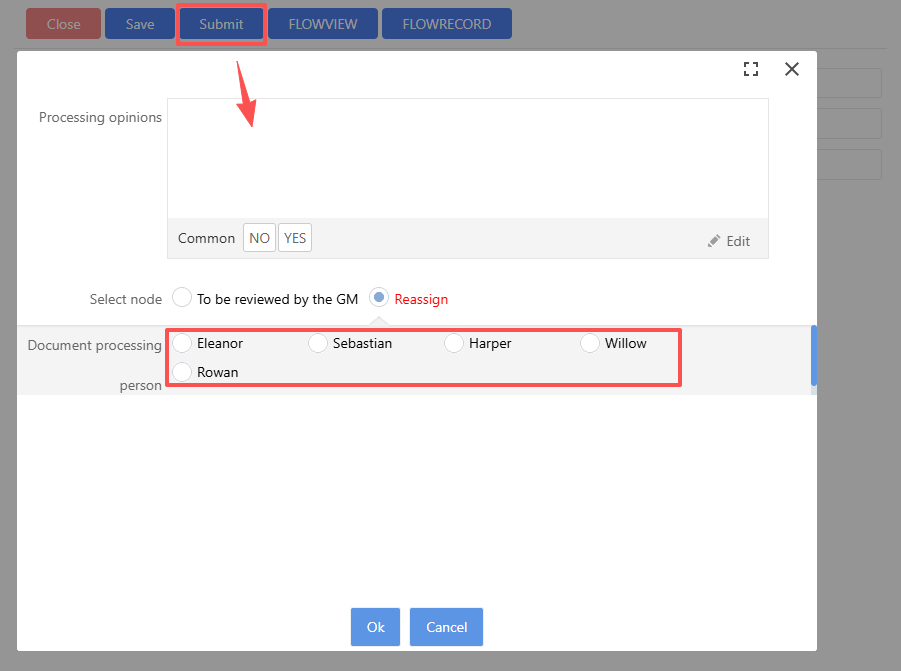
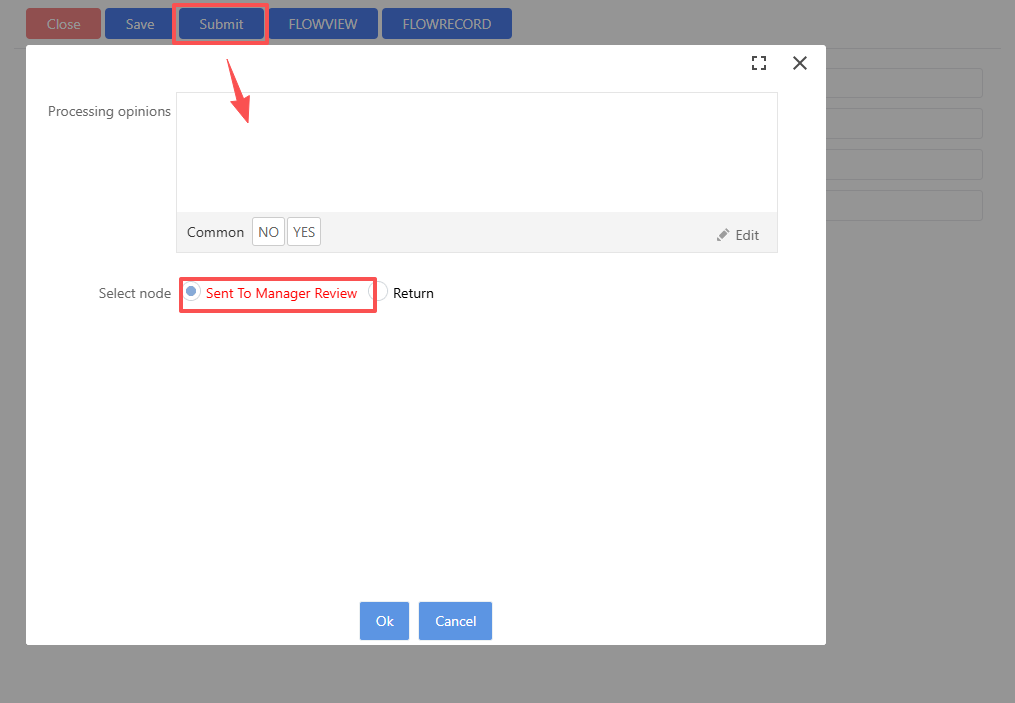
Effect as seen : When the [Submit] button is pressed from the "Dept Head Approval" node, the [Reassign] button becomes activated, enabling the configurable selection of a new person to handle the matter as seen in the figure below:
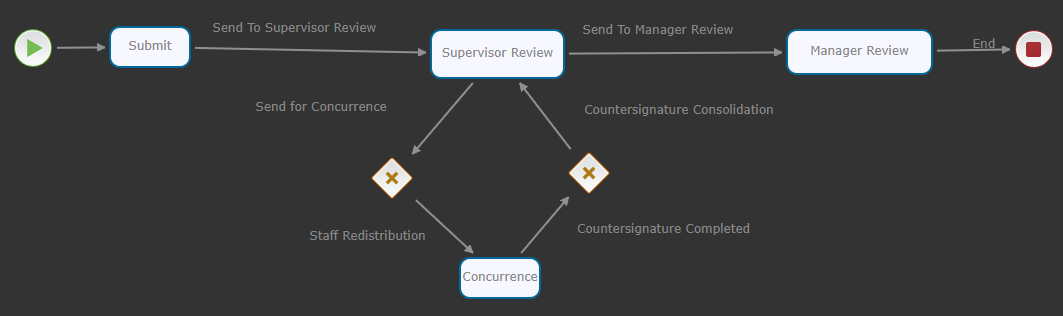
Concurrent Sign Aggregation: When coupled with the concurrent splitting function, the data that has been split is collected to ensure the condition of all these concurrent paths is satisfied for the process to advance to the next stage
Application Example :After being reviewed by Department Head, File must be submitted to though two concurrent signers from Finance management and IT Information department and then allowed to proceed to General Management Approval stage. As shown in the diagram below:
Operation as follows :
Add a "Send to Sign" line and specify here the personnel who need to participate in the concurrent signature as shown in the image below:

Add the route control (router 1), which tells the workflow engine that the process has reached here and takes down the data via "Personnel Split" lines to the next node of approval.
Add "Personnel Split" lines. At this point, the logic for handling the data that came through in router 1 must to be set. It is also necessary to set the data to split according to persons as seen in the figure below.
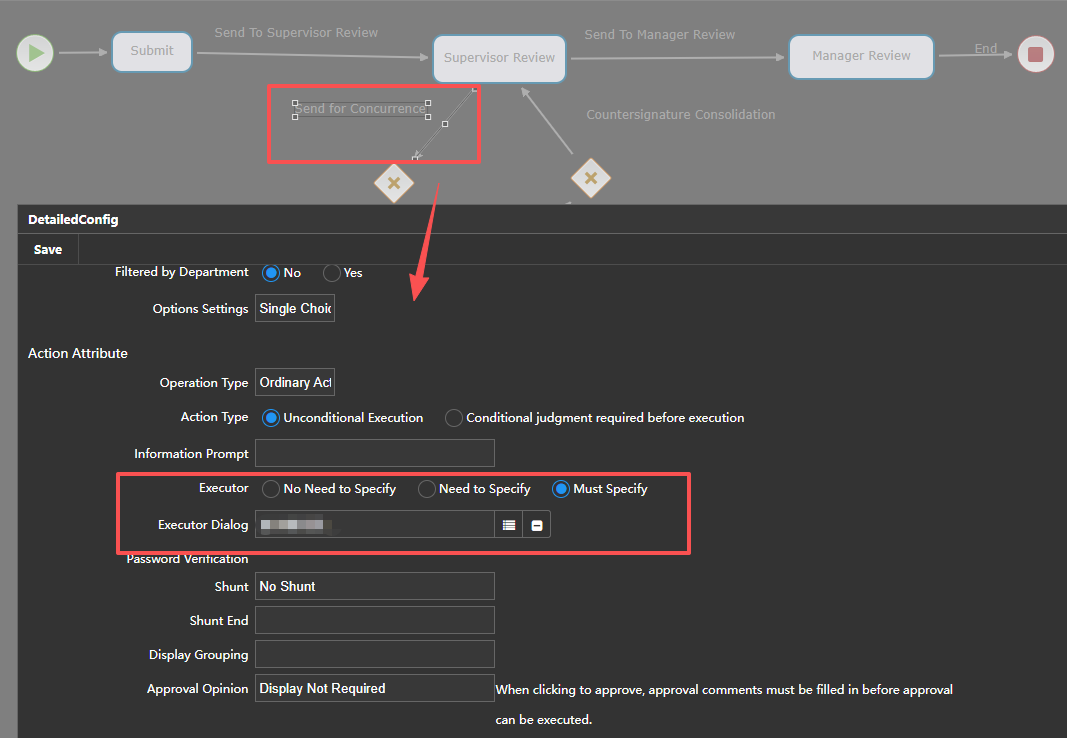
- Add a "Concurrent Sign" control, where here the concurrent signers' approval actions are processed, and set that this node accepts personnel designated by the previous node, as seen in the figure below:

- Add “Concurrent Sign End” line, to feed the data after concurrent signing back to the “Department Head Approval” node, and select "End Personnel Split" at this point, as seen in the figure below:
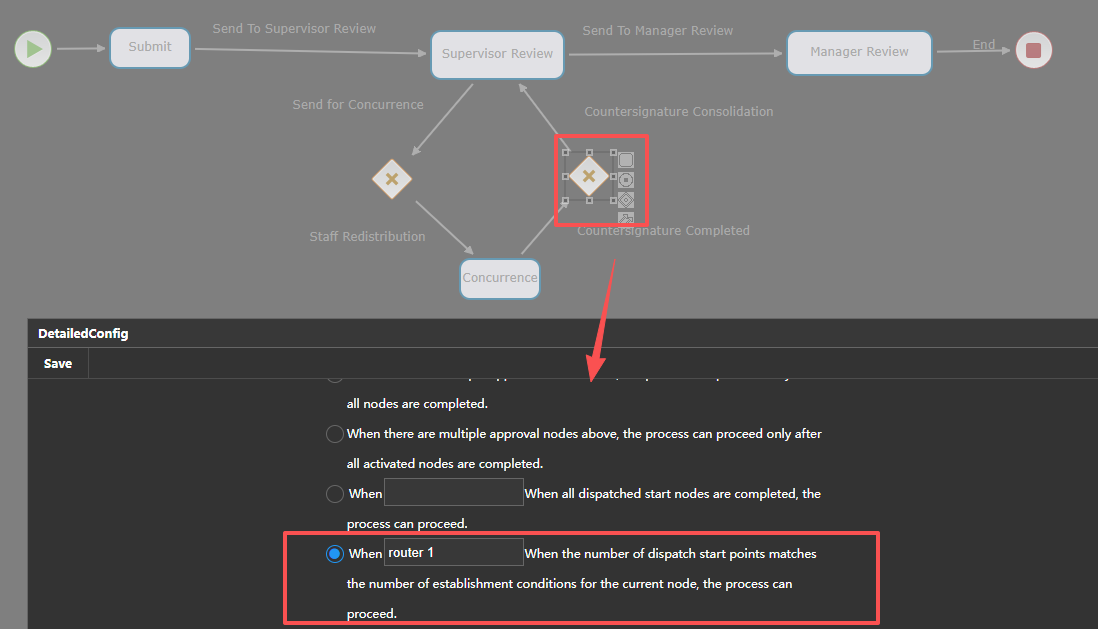
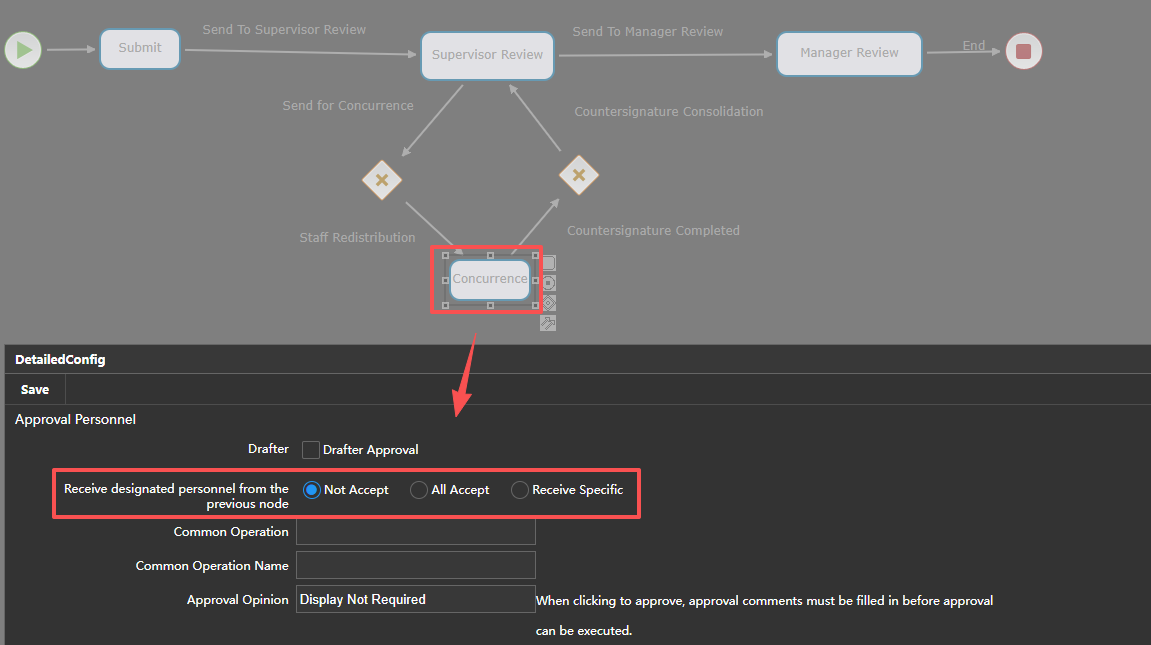
- Add a routing control (router 2) and implement logic to evaluate the data being passed to the next node. The process should only proceed to the next node after all designated approvers have completed their approval tasks. Set the approval arrival condition as follows, as shown in the figure below:
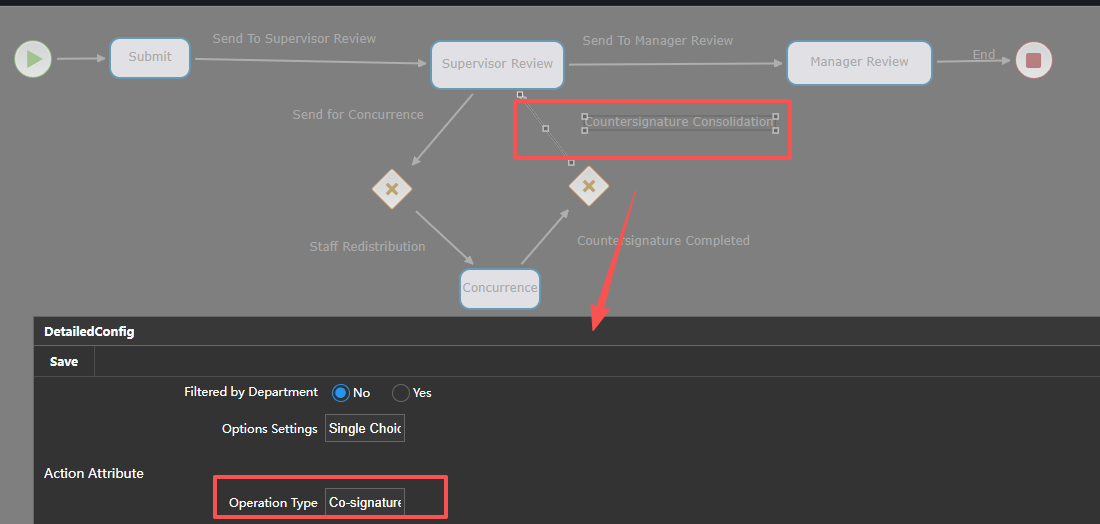
- Add a "Concurrent Sign Aggregate" line, set the operation type to concurrent sign aggregation, as shown in the figure below:
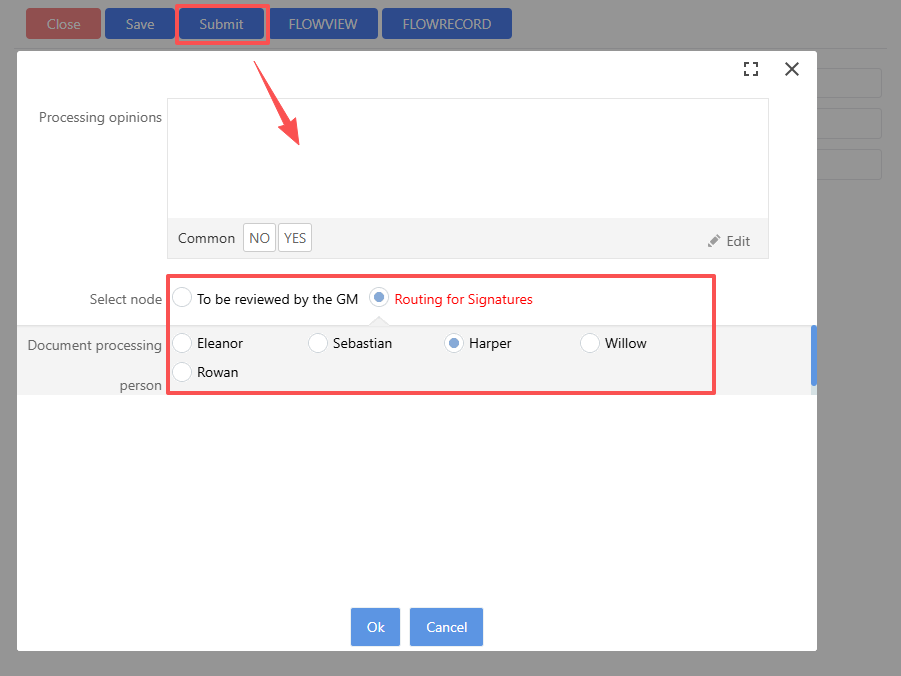
Effect as follows :At the “Department Manager Approval” node, after clicking 【Submit】, selecting 【Send to Concurrent Sign】, choose the concurrent signers as shown in the figure below:
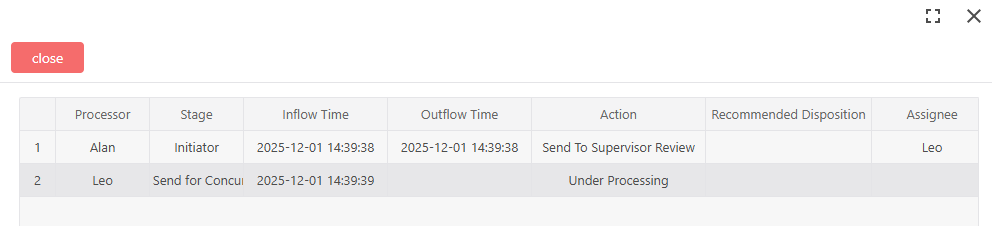
Upon completion of the concurrent signing process, the department manager logs into the application platform, clicks the corresponding form to carry out the review. At the point of clicking 【Flow Record】 on the “General Manager Approval” node’s form, the result displayed shall be as follows:

Action Type
- Unconditional Execution : No special judgment condition. Upon entering this node, it is executed directly
- Need to Judge Conditions Before Execution : This action requires calling an event handler and judging if the current condition matches the processing condition before proceeding
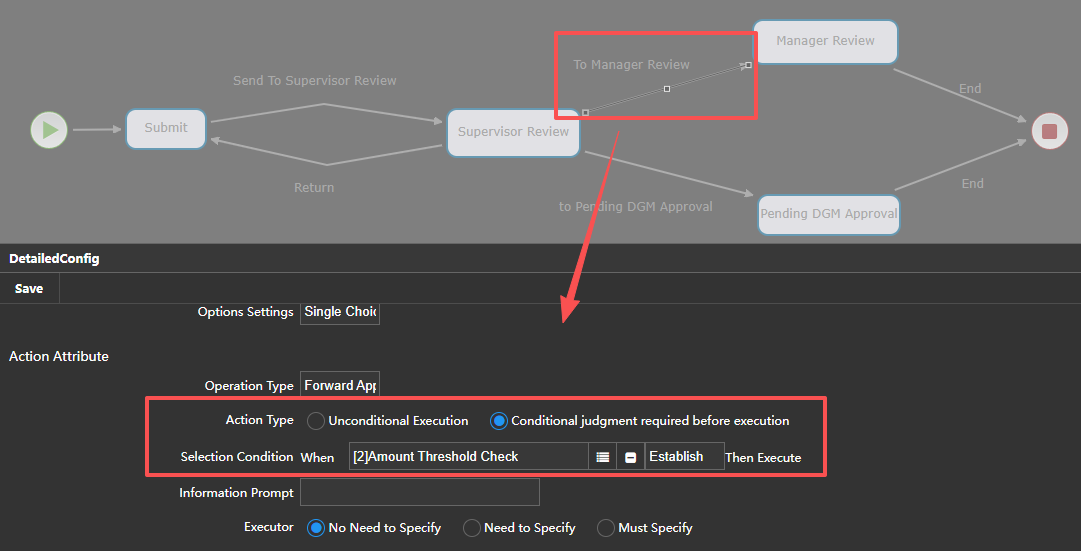
Use Case : The document has a value field in its form. During the approval process, need to make a judgment on the amount. If the amount exceeds 100,000, the CEO shall be assigned to approve; otherwise, management should be assigned. Refer to the following flow diagram:

Procedure as follows :
- Create an event to determine the amount. Click 【Basic Settings】→【Event Management】→【New】, the dialog box type is “process personnel filter” as shown in the figure below:
After completing the creation of the amount event, click to save. Complete the saving of the event.
- Set General Manager Approval Conditions (amount > 10000), as shown in the figure below:
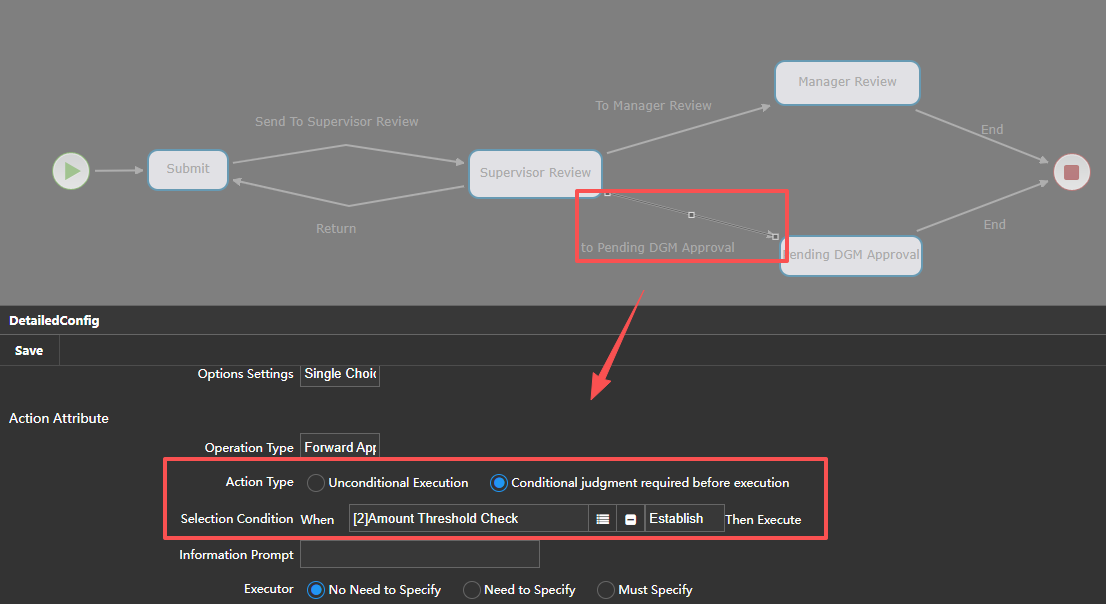
- Set Vice General Manager Approval Conditions (amount <10000 ),as shown in the figure below:

Effect as follows : Login to the application platform, click on the form to begin process review, when the form contains the value entered into the "amount" field > 10000, according to the conditional assessment, the system will only generate the option to send to general manager approval button, with the effect shown in the figure below:

When the value entered into the “amount” field on the form is <10000, according to the conditional evaluation, the system will only generate a choice button to send to vice-president approval, and the effect is shown as in the picture below:

Executable Personnel
No need to specify

No need to specify: Do not specify the executor of the next node at this approval node, but set approvers for the next approval node. The effect shown is as follows:

Need to specify
Need to specify : The approver at the current node can specify the person who will process the next approval node. If not specified, the next node will proceed with the original approvers you set for review
Application Example: In production material procurement applications, the personnel in the procurement department separately handle different types of materials. Therefore, applicants must designate which person within the procurement department will perform the review when submitting the application. The system's workflow is shown in the figure below:

Steps as follows :
Set up the selected executor scheme:Create a new personnel selection scheme under "Dialog Box Management," as shown in the image below:

After creating the new scheme, click Save to complete saving the new dialog box.
On the "Submit to Procurement Department for Review" line, set that the execution personnel of this line must be specified, and specify the above personnel choice scheme, as illustrated in the figure below:

Set up the procuration department's review node to accept the processor designated by the previous node, as shown in the figure below:

Effect as follows :Login to the application platform, open the form, and submit the procurement department for review, select the approver, as shown in the image below:

Must specify
Must specify : The approver at the current node must specify who will process the next approval node. If not specified, the system will prompt to select the executor. Then, the next approval node can allow the receiver to receive the executor designated by the previous node without setting the approver, as shown below:

Split, Split End
Used generally to complete sign-off approval, when sign-off involves many approvers or many departments, task to be assigned to each approver in the sign-off process. The split end node can be set on the connection control or manual control based on demand.
- No Split: By default, no split occurs
- Split by Approver: Subsequently, membership of the sign-off operation will be split by each of its approvers, which must all complete their operations before there's movement forward to the starting node of sign-off again
Use Case: Following the example of splitting by approver to complete sign-off type tasks. System's workflow schema as as follows:

Procedure as follows :
- Add a "Send to Sign" line, and at this point specify which personnel need to participate in the concurrent signature, set the sign-off personnel as follows:

Add the routing control (router 1), which tells the workflow engine that the process has reached this point and then claw back data via “personnel diversion” lines to the next node of approval
Add "Personnel Split" lines. At this point, the logic for handling the data flowing to router 1 needs to be assigned, and data is split according to individuals, as seen below:

- Add the "Signoff" control to process the approval actions of the sign-off personnel, and configure it to accept personnel designated by the previous node, as follows:

- Add a "Concurrent Sign End" line, to carry data after Signing back to the "First Review" node, and at this point select the end of "Personnel Split", as follows:

- Add a route control (router 2) and implement judgment logic on data proceeding to the next node point. Only after all approvers' approval tasks are completed will the process proceed to the next node. Set the approval arrival condition as follows, shown in the figure below :

- Add a “Concurrent Sign Aggregate” line, set the operation type as Concurrent Sign Aggregation, shown in the figure below,

The effect is shown in the figure below: At the "Department Supervisor Review" node, click the 【Submit】 button, as illustrated in the figure below:

Departmental Split
Departmental Split: During the sign-off process, there are multiple approval departments involved. The split function divides the sign-off tasks to all persons within the sign-off departments. After an approval action by one department within a signature approval, the flow will proceed to the node that initiated the sign-off.
Application Example: The application involves splitting by department for sign-off tasks in order to complete the sign-off process. The system workflow is illustrated as follows: 
Operation as follows :
- Add a "Send to Convene for Signature" line, and specify the personnel who must participate in the concurrent signature;

Add the routing control (Router 1) to notify the workflow engine that it reaches here and then collects the data via "Departmental Split" lines to the subsequent node of approval;
Add "Departmental Split" lines, and set the logic for processing the data arriving at the routing control, that is to split the data by department as follows:

- Add a "Concurrent Signature Aggregation " control; set the operation type to Concurrent Aggregation; adding to accept the person specified by the previous node, and the task can be considered completed for any single approver to pass or refuse. As shown in the figure below:

Add the "Concurrent Signature Completion " line to return the data processed to the first initial review, and at this point select the "End Departmental Split";
Add a Router control(Router 2); implement judgment logic on data proceeding to the next node. The process should only proceed to the next node after all designated approvers have completed their approval tasks.。ervation arrival setting as; look as follows, shown in the figure below :

- Add "Concurrent Sign Aggregate " line, set the operation type to Concurrent Sign Aggregate,

The effect is as follows: When clicking on the "General Manager Approval" node [Flow Record], you will find that only one task has been executed along with the two sub-tasks assigned to the Finance Department and IT Information Department, as follows:

Approval Opinion
During workflow approval submission in the application platform form, whether to display or not display the approval opinion display or not.
- Do not display :Approval Opinion column not displayed. Set as shown in the figure below:

The result is as follows :Once logged into the application platform to draft a form and submit for initial review, the “Submit” button appears as follows:

- Display but do not require to fill in :Approval Opinion column appears, yet may be bypassed. Result is as follows:

- Display and require:Approval Opinion column is mandatory. Appears as:

Entry Node Event
The functions included in the entry node event are as follows: 
Execute Event
Upon reaching this node, call the SQL statement or stored procedure that has been set in "Event Management" to execute a piece of code to process the form
Application Example: The "Payment Application Sheet" in the Financial Department, after being approved, will automatically update the financial department’s approval opinion to the "Approval Opinion" field. The flow is as follows:

Procedure as follows :
- Create an execute event, set its type as “Execute code,” and write appropriate code based upon business logic to update the financial department’s decision upon approval. Set it as shown in the image below:

After creating the event, click【Save】to save the event successfully.
- Set the “Entry Action” when reaching the "Special Approval by General Manager" node to execute the "Update Opinion" action defined above. The settings can be seen as follows:

The effect is as follows : Once logged into the application platform to draft a form and submit for financial review, upon entering the approval opinion as "The finance department approved it!", the【Approve Opinion】 pop-up dialog will appear automatically once the General Manager's node is reached and the [Submit] button is clicked, as follows:

Notification Content
When executing the current node, the system issues a notification based on the established setting, as shown below:

Originator
When reaching the current node, select the person to draft the notification, as the originator will receive the message. If the option is not chosen, the originator will not be notified.
For example :When the flow enters the "Department Head Review" node, it notifies the drafter "The document has been sent for approval!" The workflow is as shown in the following figure below:

The following steps are performed : Right-click the "Send to Department Head for Review" connection line and click 【Detailed Configuration】, on the detailed configuration page, select 【Notify the drafter】, enter 【Notification content】, and then click 【Save】, like this:

Implementation effect : After logging into the application platform, he/she submits a form to begin reviewing, the drafter receives a pending notice, see picture:

After completing the workflow, click 【Flow Record】 to view results like below:

Designated Person Notification
You can select one or more people to be notified. When the document is submitted for review, designated individuals will receive a notification about the review process.
For example: When sending a document to be reviewed by the department manager, notifying users Djx. The flow is as follows:

The steps are as follows : Right-click【Submit to Department Manager for Review】line control, click 【Detailed Configuration】, on the detailed configuration page, click the add button after “Designated Person Notice”, pop up a page to input the condition, click 【Search】 ,then select djx, click 【OK】is as follows:

The results are as follows : The form creator (administrator) logs into the application platform and creates a new document under the draft mode,then click [Send] to send the document to the department manager, once done, dwj logs in to the application platform following by expecting to see a piece of to-dos, shown below:

Designated Condition Notification
Set personnel filter conditions in advance, the system will send notification to all people who match the conditions
Operation as follows :
- Create an event in the Event Management,click【Basic Setup】→【Event Management】→【New】, pop up the【Create New Event】page and enter relevant information, as shown in the figure below:

After creating the new event, click 【Save】to save the event successfully.
- Right-click the link control, choose 【Detailed Settings】, and then click on the designated condition notification button. In this part, pop up a dialog box to input condition number, press 【Search】to select condition, then press 【OK】, as shown below:

The effect is shown in the figure below :The person who drafts sends the document to the department head for review. Once all department heads log into the application platform, they will see a single to-do. When the department head of ZH BO reviews, the system will directly send a task, as shown in the image below。
After completing the workflow, click 【Flow Record】 to view results like this as follows:

Manual Data Entry Elements
Click the control →【Properties】or right-click the control →【Detailed Configuration】, set its function, the approval node within the workflow can be set with the approver of this node or set the logic of entering/leaving this node, etc., for processing function。

URL Address
When binding a form to a workflow node, the first node binds to the initialization form (the form configures initialization event and startup workflow event), the second node binds to the review form (the form configures workflow open event and workflow running event) and the other nodes can bind a form based on the demand. The URL address{Domain representing}: facilitates quick binding of form to the current node。
Operation as follows :Click on the URL address{Domain representing} behind, pop-up page, select the form, as shown in the image below:

Approval Settings
The Approval Settings include the following functions as shown below:

Note :For ordinary process handling time, fast processing time, ultra fast handling timeout reminders, timeout rollback, timeout rollback Number locked by document by current system version, when there is a need, special customization can be done.
Signature Method
There are two ways to set signature process when form reaches approval node, auto signature, manual signature. The difference between manual and automatic signatureis that in manual signature only after the approver of the current node clicks "Sign" manually, can he/she modify or approve the current form. With auto signature, no signature button needs to be clicked directly signed by the program.;
Example: To apply manual signature method when the form arrives at “Financial Review”,as shown in the following figure: 
operation:Set the signature method of the current node as manual in the "Financial Review" node, as shown below: 
Results as shown: 
Recall Action
After the form has been issued and a problem arises, the form can be recalled and reprocessed if the approval by the next node has not been signed off yet
Example :After the draft is submitted to the Financial Dept. for review, assuming that the application amount was wrong. It’s possible to recall and reprocess the drafting cycle. The system flow is as follows: 
Operation as follows:Set the recall action to “Allow Recall” on the financial review node, as shown in the picture below: 
Effect:In the application platform, after drafting the form and submitting it for financial review, the person validating will open the form, then click 【Recall】to recall the form as shown in the image below:

Approval Arrival Settings
Set Condition One
Set Condition One:When the previous step has multiple approval nodes, as long as one of them is completed, the flow can reach
Application Example :To realize simple convergence mode of workflow, system flow is as shown in the following figure:

Procedure as follows :
On the "Submit" node, set the approval dispatch action to, as shown in the image below:

Beneath the “General Manager Approval Stage”, configure the 'approval arrival conditions' to be, as depicted in the image below:

Effect :Once procurement department or financial department-approved,the flow will proceed to General Manager Approval stage, flow effect shows as below figure: 
Set Condition Two
Set Condition Two :When previous step has multiple approval nodes, all nodes completed, the flow can reach
Application Example :To implement synchronous workflow mode, System flow as shown in figure below。

Procedure as follows :
On the "Submit" node, set the approval dispatch action to, as shown in the image below:

On the “General Manager Approval” stage, set the approval arrival action to as follows, as shown in the picture below:

Effect :Only upon approval by both the procurement department and the financial department can the flow proceed to the General Manager examination stage, as in the picture below,Once you click【View Flow】to review the workflow management document, this is how the system works:

Set Condition Three
Set Condition Three :When the previous step has multiple approval nodes, when all the activated nodes are completed, the process can proceed forward
Example for Application :To implement a workflow choice mode, as shown in the diagram below: 
Operate as follows:
Set the "Send Approval" action on the "Submit" node to this value, as seen below:

Set "Approval Arrival" to the following value on the “General Manager Approval” node, as seen in the figure below:

Effect :When starting the approval stage, such as for Finance and Administration, as shown below: 
Once the two nodes are completed, the General Manager Approval node will be initiated, and after completion, upon clicking to view the process, the result will look like this figure below:

Set the Condition Four
Set the Condition Four: When all the activated previous nodes are completed, the flow can reach the start node, though the drop-down menu will show all previous nodes ahead of this node
Application Example :To implement a workflow multi-choice mode, the system workflow can be illustrated as the following figure: 
Procedure as follows :
On the "Submit" node, set the approval dispatch action to, as shown in the figure below:

On the "General Manager Approval" node, set the approval arrival action to, as shown in the figure below:

Effect :All nodes that have started from the Submit node, as shown in the figure below: 
Once all these nodes finish their approval, the General Manager Approval node can start its work, after doing so, upon clicking to view the workflow, the result is shown as the figure below:

Set Condition Five
Set Condition Five :When the number of activated nodes assigned forward equals the number of established conditions for this current node, the process can proceed to the next node. This condition involves validating the data passed to the next node, and only when all assigned approvers complete their processes does the flow proceed forward to the next node
Application Example :For example, a consultation process where multiple people could be assigned to review simultaneously, and once all those individuals finish reviewing, the process proceeds to the next node. System workflow as follows: 
Operation :Set the approval arrival settings for the router control (Router 2) to the mode described above, as seen below: 
Effect :In the application platform, click the form to begin workflow review. At the "General Manager Approval” node, click【Flow History】to view the workflow as in the figure below: 
Approval Send Settings
Set Condition One
Set Condition One :When there are multiple approval nodes in the next step, only select one node and set the submit button label to “Submit” (default is set) and display mode to Menu mode (available as either matrix and menu mode, default is matrix mode)
Application Example :Can manually select the next approval node, but only one node can be selected at a time. Submit button changed name to “Send To” and displayed in menu style, flow shown below: 
Operation Action :Set approval sending settings of Submit’s step to 【One destination app node can be selected】【Change submit button label to Send To】【Display type is Show as menu】as follows: 
Effect Described :Upon logging into the application platform, click to complete the submission review process, as shown below: 
Set Condition Two
Set Condition Two :When there are multiple approval nodes in the next step, dispatch to all nodes and set the display mode of the selection button.(Note: Submit button settings are handled in condition one)
Application Example :When reviewing a record in the application platform by clicking the form for submission, clicking the “Submit” button brings up a pop-up screen. By clicking "OK," the system will send the review request to all next step approval nodes. System workflow as seen below: 
Operation Action :Set approval sending settings to【Send to all destination app nodes】【Show option to send to multiple nodes】for the Submit node as follows: 
Effect Described :After logging into the application platform and submitting a form, click the Submit button to see the workflow as follows:

Set Condition Three
Set Condition Three :When there are multiple approval nodes in the next step, multiple nodes can be selected, and the name of the selection button can be set (the default name is “Submit”).
[Note]: Submit button name and display mode are set in Condition One.
Application Example :Multiple approval nodes can be manually selected for the next review step. The system flow is shown in the figure below:

Operation as follows :Set approval sending settings of Submit’s step to 【Under current node▶When there are multiple destination approval nodes, you can choose multiple ones upside】 ,See the picture below:

Effect as shown below:Login to the application platform,Click to complete the submission review form,The figure below:

Approval Personnel
The functions included in the approval personnel are as follows:

Author
When the document reaches this node, it will be approved by the author himself/herself
Example :Login to the application platform, click the draft form to submit for review, and upon completion, the author will receive a to-do reminder to complete the review process, as shown in the picture below:

Operation as follows :Workflow setting node “Department Head Review” approval personnel as author, as shown in the figure below: 
Common Action, Common Action Name
Common Action :Includes "Return to the previous point", and “Return to the previous level”。 Return to the previous point is when there are multiple approvers in the previous node, the system will only return the process to the last approver in the previous node who completed his/her review action; return to the former node directly - Return to the former node without requiring all approvers in the former node to re-approved。
Common Action Name :Shows the name of this gesture node。
Application example of Return to the previous point: At the "Procurement Department Review" node, both approvers must be approved;after approval, the process goes to the "General Manager Approval" node, where the current node is chosen such as to revert the process to only the last approver of the Procurement Department to which the initial finisher had signed off upon being chosen, requiring only that person to reapprove, whereas the first person does not have to re-approved again. The system workflow is as shown in the figure:

Operation as follows:
- In “Department Head Review” node, specify approvers as shown in the figure below:

- In “General Manager Approval” node, set up common action to “Return to the former step”, and give common action name “return to the prior order” as shown in the figure below:

Effect as follows:Assignor (system) submits document to department head review, Both reviewers need to pass the system to complete their reviews (Wang Li is the last reviewer). Once General Manager Approval node starts, General Manager logs in to system and views approval window. Click [Submit], selects to harmonize to the preceding node (Returns to said last reviewer “Wang Li”), shown in the figure:

Finally, the last reviewer, “Wang Li,” logs into the application platform and re-checks before submitting to “General Manager Approval” and according to),general manager logs in,clicks [flow history] sub-window returns, effect like this picture:

Return to the upper level application example: When reaching the "General Manager Approval" node, you can choose to return to the previous level for reapproval. The system workflow is shown in the following figure:

Operation follows: In the "General Manager Approval" node, set up general action to “Return to the former level”, General action name “Return to the former level”,as shown in the picture below:

The effect is as follows: The initiator drafts a form and submits it for Procurement Department review. After approval, it is forwarded to the General Manager for review. The General Manager logs into the system, clicks [Submit], selects the node [Return to Previous Level], and then clicks [Confirm], as shown in the figure below:

Procurement Department staff logs into the application platform to review the document again, click【flow record】,the effect is as follows:

Accept the designated personnel specified by the previous node
Allow or do not allow acceptance of designated personnel specified by the previous node. When the previous node is being approved, the approvers of this current node have already been determined (can be one or more people), select whether to accept the designated personnel from the previous node. If not allowed, approvers need to be set on this current node。
Allow application example :allow accepting designated personnel specified by the previous node, realizing that when submitting a form, one can choose which personnel will review in the next node manually, the present node is 【Procurement Department Review】, system flow is as the figure below:

Operation as follows :
Set the execution personnel option on the "Send to head of Department for review" control to “Allow accepting the personnel assigned by the preceding stage”,as shown in the figure below:

Set up the “Procurement Department Review” node so that it allows receiving the person specified by the previous node, as shown in the figure above:

Effect :Log in to the application platform, click the form to review it, click [Submit], pop-up page to select reviewers, click [OK], reviewers log in to the system to review the form, the effect is as follows:

Do not allow example : Do not allow accepting designated personnel from the previous node, which requires adding designated approvers on the current node. Even though the previous node "Send to Head of Dept for review" specifies agents, when reviewing, only the approver set in the current node can be accepted. The current node is 【Procurement Department Review】, system flow is shown below:

Operation as follows :
- Set the execution personnel option on the "Send to head of Department for review" control to “Do not allow accepting the personnel assigned by the preceding stage”,as shown in the figure below:

- Set the “Procurement Department Review” node not to accept agents from the previous node, and click the plus icon next to the designated approver, as shown in the figure below Select the approver:

Effect :Log into the application platform, click the form to submit for review, select the approver, as shown in the following picture:

Click on [OK] and the person designated in the “Procurement Department Review” node, “Zhang**”, will receive a to-do notice. When he clicks on the review window, it will appear as follows:

At the “Procurement Department Review” node, the approver may only be “Zhang**”, who approves. After clicking the review process window, the effect can be seen as shown in the picture below:

Designated approver
Specify the exact approver(s) for this node (multiple approvers can be set). See below:

Click the minus button next to the designated approver to remove an approver
Approver code
Select the personnel that meet the specified condition by setting it in "Event Management" and choosing the people who fit the criteria as approvers for this node
Application Example :Current node requires department heads to approve, to realize this, the approvers at this node are the leaders of various departments, system flow is as follows:

Operation as follows :
- In Event Management, set the personnel filter conditions, choose approvers who meet the criteria as approvers for this node, event type is: "Personnel Filters", as shown:

After creating the new event, click 【Save】to save the event successfully.
- Set up the "Purchasing Department Review" node's designated approver code as follows:

Click the minus button next to the designated approver to remove an approver code.
Effect is as follows (after selecting all, leaders of various departments will receive approval tasks):

Designated department
Realizing the function of authorizing and realizing certain nodes' hierarchy by department within a workflow, by having department workflow administrators set personnel, each department follows its own workflow, managed by its designated personnel group
Application case : Multiple departments can use the same approval workflow, but in different departments, the approvers at the same node are specified by that department respectively. For example, personnels of accounting and IT information department respectively initiate forms and send for the initial review node for review. Flow according to the department to which the person who initiated the form belongs automatically sends to that department’s administrator for review, once approved, the form is sent to the second review step to be reviewed by human resource department staff, after approval, the flow ends. The system process chart as follows:

Operation as follows :
- Set the “Initial Review” node as IT Information Department and Accounting Department,don’t filter , choosing 【Yes】as below:

- Configure the "Recheck" node designated department as HR,and select 【No】as below:

Selecting the designated department, click the minus button after the department number to remove a department。
- Assign department workflow administrator personnel (note that these personnel must correspond with the current department),a new window appears, select the person(IT Information Department personnel:wc,h、Accounting Information Personel:Wang Manager, HR department personel:HR),as shown below:

Effect as follows :
IT Information Department personnel (wch) draft a form and submit for initial review, when IT Information Department workflow administrator (Wang Manager) approves, it goes to be re-reviewed by HR department personnel, and after approval, the process ends. The reviewer at the recheck node (HR) logs into the system and clicks the form to see the flow record, and the effect is as follows:

The finance department personnel (zjn) drafts a form and submits for initial review, when the financial department workflow administrator (Financial Department Manager) approves, it goes to be re-reviewed by HR department personnel, and after approval, the process ends. The reviewer at the recheck node (HR) logs into the system and clicks the form to see the flow record, and the effect is shown in the following figure:

Filter by Department
Filter by Department (Yes/No/Selected):If selected as "Yes", the approvers at this node are determined by the superior department of the person who submits the document. If selected as "No", regardless of which department the person who submitted the document belongs to, the specified approver makes the decision. If selected as "Selected", you can choose to filter by department, refer to the section on department filtering for detailed configuration。
For example :If the designated department is “Procurement Department” and the designated approver is “Manager Wang” and filtering by department, the system checks the higher department of the person who submitted the document. If the person belongs to the “Procurement Department,” then Manager Wang will make the approval. However, if Manager Wang's department does not fall under this node's defined designation, the node will be bypassed. Conversely, if the designated department is “Department of Procurement” but not filtered by department, regardless of which department the person who submitted the form is from, Manager Wang makes the final decision。
Operation type:
- All approvers must approve to pass the node :When multiple individuals must complete to approve this current node, the system will only proceed to the next node after all approvals have been completed。
For example :Flow node "Procurement Department Review" sets approvers to Wang Manager, Finance Department Manager, only when both are approved, the process can proceed to the "General Manager Review" stage;flow as follows:

Operation as follows :
- In “Procurement Department Review” node, set designated approvers to Wang Manager and Financial Department Manager,并 select Operation Type as 【All approvers must approve to pass the node】, as shown below:

- Set the "General Manager Review" node approval personnel to author

Effect as follows :
- Log into the application platform, click the form to review it for process approval, after Wang Manager and the Finance Department Manager approve, under the "General Manager Review" node, click [flow record] to see the effect like the illustration below:

- Any one approver can pass the node:There is one or more individuals who perform the approval at the current node, but once one of the approvers completes the approval, the form will proceed to the next node。
For example :Flow stage "Procurement Department Review" has two approvers, Wang Manager and Finance Department Manager, whichever of these two approves, the process can arrive at the "General Manager Review" stage, as shown in the flow chart below:

Operation as follows :
- In “Procurement Department Review” node, set designated approvers to Wang Manager and Financial Department Manager,并 select Operation Type as 【Any approver approves to pass】,as shown below:

- Set the "General Manager Review" node approval personnel to author,as shown below:

Effect as follows : Login to the application platform, click the form to review it for process approval, when Wang Manager or Finance Manager approve, in the "General Manager Approval" node, click [flow record] to see the effect as follows:

Entry Node Event, Node Passing Event, Back Event


Entry Node Event :The event of a workflow entering the node, which can set an operation type and execution event。
Node Passing Event :The event of a workflow passing through the node, which can set To notify draft person and content, to notify指定 people, to choose to notify people according to the set conditions, to execute the event。
Back Event :The back action of the workflow in this node, which can set.notify the draft person and content, to notify specified people, to select people to notify according to the set conditions, or execute the event。Refer to the entry node action section for detailed configuration。
Auto Controls
Click the menu bar [Properties] or right-click the control → [Properties Configuration], to set its function, automatic controls mainly call other functions, realizing such features as CC/recall logic deletion/physical deletion/passed to the upper node, returned to the previous level, etc。
Return to Upper Level
**Return to Upper Level **: Returns a workflow node to a previous level, and its system process is as follows:

Application Example: At "Department Head Approval" node requires Manager Wang and Finance Department Manager to conduct approval, only when both pass, the process goes to "General Manager Approval" stage. In such instance, upon choosing to step back to higher level, the system returns to the previous node, only to the last person completing the approval action, in this case Finance Director, requiring them to revalidate, while the first one doesn't have to go through the process again。
Operation as follows :
Set specified approvers at "Department Head Approval" node to Manager Wang and Finance Department Manager,as follows:

Add an auto control on the “General Manager Approval” node, and set its auto action to Return to Previous Level,as follows:

Effect as follows :Login to the application platform, click the form to perform workflow review, and when completing to “General Manager Review” node, submit by selecting to "Return to the Upper Level" as shown in the picture below: 
Once returned to the previous level, the financial manager logs into the platform and clicks the代办 form, then clicks [Workflow Record] to see the record effect shown below:

Return to Upper Level
Return to Upper Level :Directly returns the current node to the previous one, requiring that all approvers at the previous node restart the review process. The system procedure is as follows:

Application Example :At the "Department Head Approval" node, Manager Wang and the Finance Department Manager must both undergo approval. Only after both have completed the review will the process move to the "General Manager Approval" stage. If you choose to go back to the previous stage, the system will return to the "Department Head Approval" node, requiring both Manager Wang and the Finance Department Manager to review again
Operation as follows :
In “Department Head Approval” node, specify approvers as shown in the figure below:

In “General Manager Approval” add automatic control, and set its automatic action to Return to upper level, as shown below:

Effect as follows :Login to the application platform, draft a form, and send it for review by management. Once approved, forward to the GM review stage. Upon GM review, login to the application platform and select to “Return to Upper Level”, as shown below:

The management approval personnel login to the application platform, click on the agent form and then click [Flow Record], as shown in the figure below:

Logic Delete
Logic Delete :Terminates the workflow approval process for the current form
Example :If the General Manager needs more flexibility, he or she can delete a form and bypass the approval at any time during the approval process. The system workflow resembles the figure below:

Operation follows :Add an auto control to the “General Manager Approval” node and set its auto action as logic delete, as illustrated below:

The outcome is as follows :Login to the Application Platform, initiate the General Manager Approval process, and upon clicking [Submit], select “Logic Delete” as shown in the following image:

Physical Delete
Physical Delete :Physically deleting means to directly remove the current approval document from the database, and the data cannot be retrieved anymore
Reassigning
Reassigning :Assigns the current approval task to a specific designated person for review
Example :The General Manager can assign another person to take over the current task approval on this form instead of him, and the system workflow is as depicted below:

Operation as follows :
- In the "Redirect" line set redirects to specific personnel who would approve, as seen in the figure:

- Add an automatic control and set action to redirect with specified individuals accepted from the previous step, as shown below:

Effect as follows : Login to the application platform, at the "GM Approval" step, click [Submit] and select the redirect, as seen in the figure:

The new approver logs into the platform, clicks on the form, then clicks [Flow Record], and will see the results as shown in the picture:

CC (carbon copy)
CC :Sends the current form to specified individuals for viewing only; no approval or modification is allowed
Use case example :In this node, the form is sent to specific individuals for review, with the following process illustrated in the diagram below:

Action steps :
- Set the direct personnel to whom redirection is to occur under the "CC" line, as shown in the picture:

- Add an automated control, and set the common operation to CC, accepting designated individuals from the previous step, as shown in the picture:

Resulting effect:Upon logging in to the application platform, click the form to perform workflow review, then at the “General Manager Review” node, click [Submit] and choose to CC to a person, as shown in the picture:

After choosing to CC, click on the workflow record [Flow Record] to see the effect:

CC to applicant
CC to applicant :Is identical to CC function, but doesn't require selector for the CC's recipients, directly sends the CC content to the creator of the form//
Routing Controls
Click the Control menu bar [Properties] or right click the control → [Detailed Configuration], to set its function, Routing controls are used without business logic rules, routing activities tell the workflow engine that business must be handled in special ways or through logical judgments before proceeding to the next nodes, depending on the condition being established now, and then branched accordingly;
Example of use case :Based on specified conditions, the system can automatically judge the amount contained in a submitted document, and if triggered, the system will direct the document to either the General Manager or a Vice President's approval path automatically. The system follows this procedure flow:

Action steps :
Add a Route Control and direct the request to reach the General Manager for an Approval or to the Vice President by applying criteria based on set conditions
Create an event with conditions based on real form data amount in the tab '[Event Management]', such as follows image:

After creating the new event, hit 【Save】and finish saving the event details;
- In the Connection flow going to “General Manager Approval” Add condition logic to the [Done] action, as shown below:

- Then define on the line leading to “Vice President Approval” to proceed minus that criteria checked. As shown below:

Resulting effect:When the document being reviewed has an amount less than 10,000, then routing happens first, as would be understood visually from the diagram, leading to the step called “Vice President Review” or any path left to another option, concurrently clicking【Flow View】 on the documents GUI, view effect like this following Figure:

When the current form’s amount exceeds 10,000,data routing processed according to guidelines, form redirected to “General Manager Approval” path, upon visiting the form’s GUI and clicking [View Flow Detail], result displays shown below:

End Controls
Indicates the end of this process, a process can be ended by n end activity, end activity can choose to approve or reject the form. Click control on the properties or right-click control → Detail Settings, to set its function.