Using MCP in VJSP
The Model Context Protocol (MCP) extends VJSP's capabilities by connecting to external tools and services. This guide covers everything you need to know about using MCP in VJSP.
Configuring MCP Servers
MCP server configuration can be managed at two levels:
- Global Configuration: Stored in the
mcp_settings.jsonfile, accessible via IDE settings (see below). These settings apply to all workspaces unless overridden by project-level configuration. - Project-Level Configuration: Defined in the
.vjsp/mcp.jsonfile at the root of your project. This allows you to set up project-specific servers and share the configuration with your team by committing the file to version control. If present, VJSP automatically detects and loads this file.
Priority: If a server name exists in both global and project configurations, the project-level configuration takes precedence.
Editing MCP Settings Files
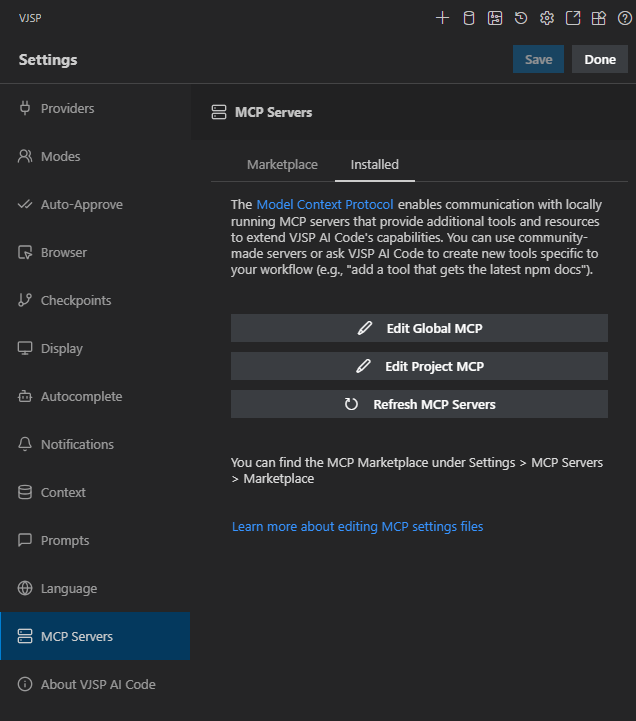
You can edit both global and project-level MCP configuration files directly from the VJSP MCP settings view:
- Click the ⚙️ icon in the top navigation bar of the VJSP pane to open
Settings.
- Click the MCP Servers tab on the left.
- Select the Installed server.
- Click the corresponding button:
Edit Global MCP: Opens the globalmcp_settings.jsonfile.Edit Project MCP: Opens the project-specific.vjsp/mcp.jsonfile. If this file doesn’t exist, VJSP will create it for you.
Both files use JSON format and contain an mcpServers object with named server configurations:
{
  "mcpServers": {
    "server1": {
      "command": "python",
      "args": ["/path/to/server.py"],
      "env": {
        "API_KEY": "your_api_key"
      },
      "alwaysAllow": ["tool1", "tool2"],
      "disabled": false
    }
  }
}Example MCP server configuration in VJSP (STDIO transport)
Understanding Transport Types
MCP supports two transport types for server communication:
STDIO Transport
Used for servers running on the local machine:
- Communicates via standard input/output streams
- Lower latency (no network overhead)
- Better security (no network exposure)
- Simpler setup (no HTTP server required)
- Runs as a child process on the local machine
For in-depth information on how STDIO transport works, see STDIO Transport.
STDIO configuration example:
{
  "mcpServers": {
    "local-server": {
      "command": "node",
      "args": ["/path/to/server.js"],
      "env": {
        "API_KEY": "your_api_key"
      },
      "alwaysAllow": ["tool1", "tool2"],
      "disabled": false
    }
  }
}SSE Transport
Used for remote servers accessible via HTTP/HTTPS:
- Communicates using the Server-Sent Events (SSE) protocol
- Can be hosted on a different machine
- Supports multiple client connections
- Requires network access
- Enables centralized deployment and management
For in-depth information on how SSE transport works, see SSE Transport.
SSE configuration example:
{
  "mcpServers": {
    "remote-server": {
      "url": "https://your-server-url.com/mcp",
      "headers": {
        "Authorization": "Bearer your-token"
      },
      "alwaysAllow": ["tool3"],
      "disabled": false
    }
  }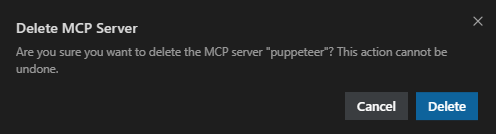
}Removing a Server
- Click the icon next to the MCP server you want to remove.
- Click the Delete button in the confirmation dialog.
Restarting a Server
Click the icon next to the MCP server you want to restart.
Enabling or Disabling a Server
Toggle the switch next to the MCP server to enable or disable it.
Network Timeout
Sets the maximum time to wait for a response after invoking an MCP server tool:
Click the Network Timeout dropdown at the bottom of an individual MCP server configuration box and adjust the duration. The default is 1 minute, but it can be set between 30 seconds and 5 minutes.
Auto-Approve Tools
MCP tool auto-approval is configured per tool and is disabled by default. To set up auto-approval:
- First, enable the global "Use MCP Servers" auto-approval option in Auto-Approval Actions.
- In the MCP server settings, locate the specific tool you want to auto-approve.
- Check the Always Allow checkbox next to the tool’s name.
Once enabled, VJSP will automatically approve this specific tool without prompting you. Note that the global "Use MCP Servers" setting takes precedence—if it is disabled, no MCP tools will be auto-approved.
Finding and Installing MCP Servers
VJSP does not come with any pre-installed MCP servers. You need to find and install them separately.
- Ask VJSP: You can ask VJSP to help you find or even create an MCP server (when "Enable MCP Server Creation" is enabled).
- Build Your Own: Use the SDK to create custom MCP servers that extend VJSP with your own tools.
Using MCP Tools in Workflows
Once you’ve configured an MCP server, VJSP will automatically detect the available tools and resources. To use them:
- Type your request in the VJSP chat interface.
- VJSP will recognize when an MCP tool can help fulfill the task.
- Approve tool usage when prompted (or rely on auto-approval if configured).
Example: Typing "Analyze my API performance" might trigger an MCP tool that tests your API endpoints.
Troubleshooting MCP Servers
Common issues and solutions:
- Server unresponsive: Check that the server process is running and verify network connectivity.
- Permission errors: Ensure correct API keys and credentials are configured in
mcp_settings.json(for global settings) or.vjsp/mcp.json(for project settings). - Tool unavailable: Confirm that the server properly implements the tool and that it isn’t disabled in the settings.
- Slow performance: Try adjusting the network timeout value for the specific MCP server.
Platform-Specific MCP Configuration Examples
Windows Configuration Example
When setting up an MCP server on Windows, you need to use the Windows Command Prompt (cmd) to execute commands. Below is an example configuration for the Puppeteer MCP server on Windows:
{
  "mcpServers": {
    "puppeteer": {
      "command": "cmd",
      "args": [
        "/c",
        "npx",
        "-y",
        "@modelcontextprotocol/server-puppeteer"
      ]
    }
  }
}This Windows-specific configuration:
- Uses the
cmdcommand to access the Windows Command Prompt - Uses
/cto tellcmdto execute the command and then terminate - Uses
npxto run the package without permanently installing it - The
-yflag automatically answers "yes" to any prompts during installation - Runs the
@modelcontextprotocol/server-puppeteerpackage, which provides browser automation capabilities
For macOS or Linux, you would use a different configuration:
{
  "mcpServers": {
    "puppeteer": {
      "command": "npx",
      "args": [
        "-y",
        "@modelcontextprotocol/server-puppeteer"
      ]
    }
  }
}The same approach can be applied to other MCP servers on Windows—just adjust the package name as needed to match different server types.